5 Steps To Making Your First VR Game
Ever wanted to make your own virtual reality game but weren’t sure where to start? This guide will get you going using Unity and a Google Cardboard to make your first VR game. Unity is free to download and you can either make your own Cardboard or buy one from the link above. To make sure you have all the current assets please follow the ~Before Starting~ guide.
Here is the Github link to this project.
~Before Starting~
Android
If you’re planning on porting to Android, please follow the steps outlined in this guide. This will include:
- Downloading the latest version of Unity. Make sure to select porting to Android as an extra feature to install.
- Downloading the Cardboard SDK for Unity (as well as their demo if you wish)
- Downloading the Android SDK
iOS
If you’re planning on porting to iOS, please follow the steps outlined in this guide. This will include:
- Getting an iOS developer account.
- Downloading the latest version of Unity. Make sure to select porting to iOS as an extra feature to install.
- Downloading the latest version of Xcode and iOS SDK (not the beta version).
- Following instructions for setting up Xcode porting to your iOS device.
- Downloading the Cardboard SDK for Unity (as well as their demo if you wish).
Setting Up
1. Make a new project.
- First thing you should do is make a new project. This will bring up the project window.
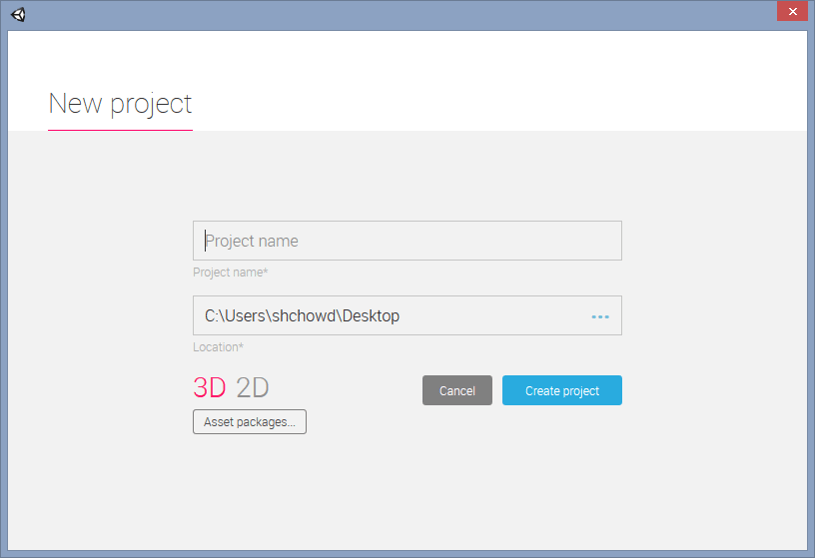 The Project Window
- Make sure you select 3D. Give your project a good name. I named mine CollectEmAll.
2. Import the Cardboard assets.
- Under Assets -> Import Package -> Custom Package, select the cardboard SDK.
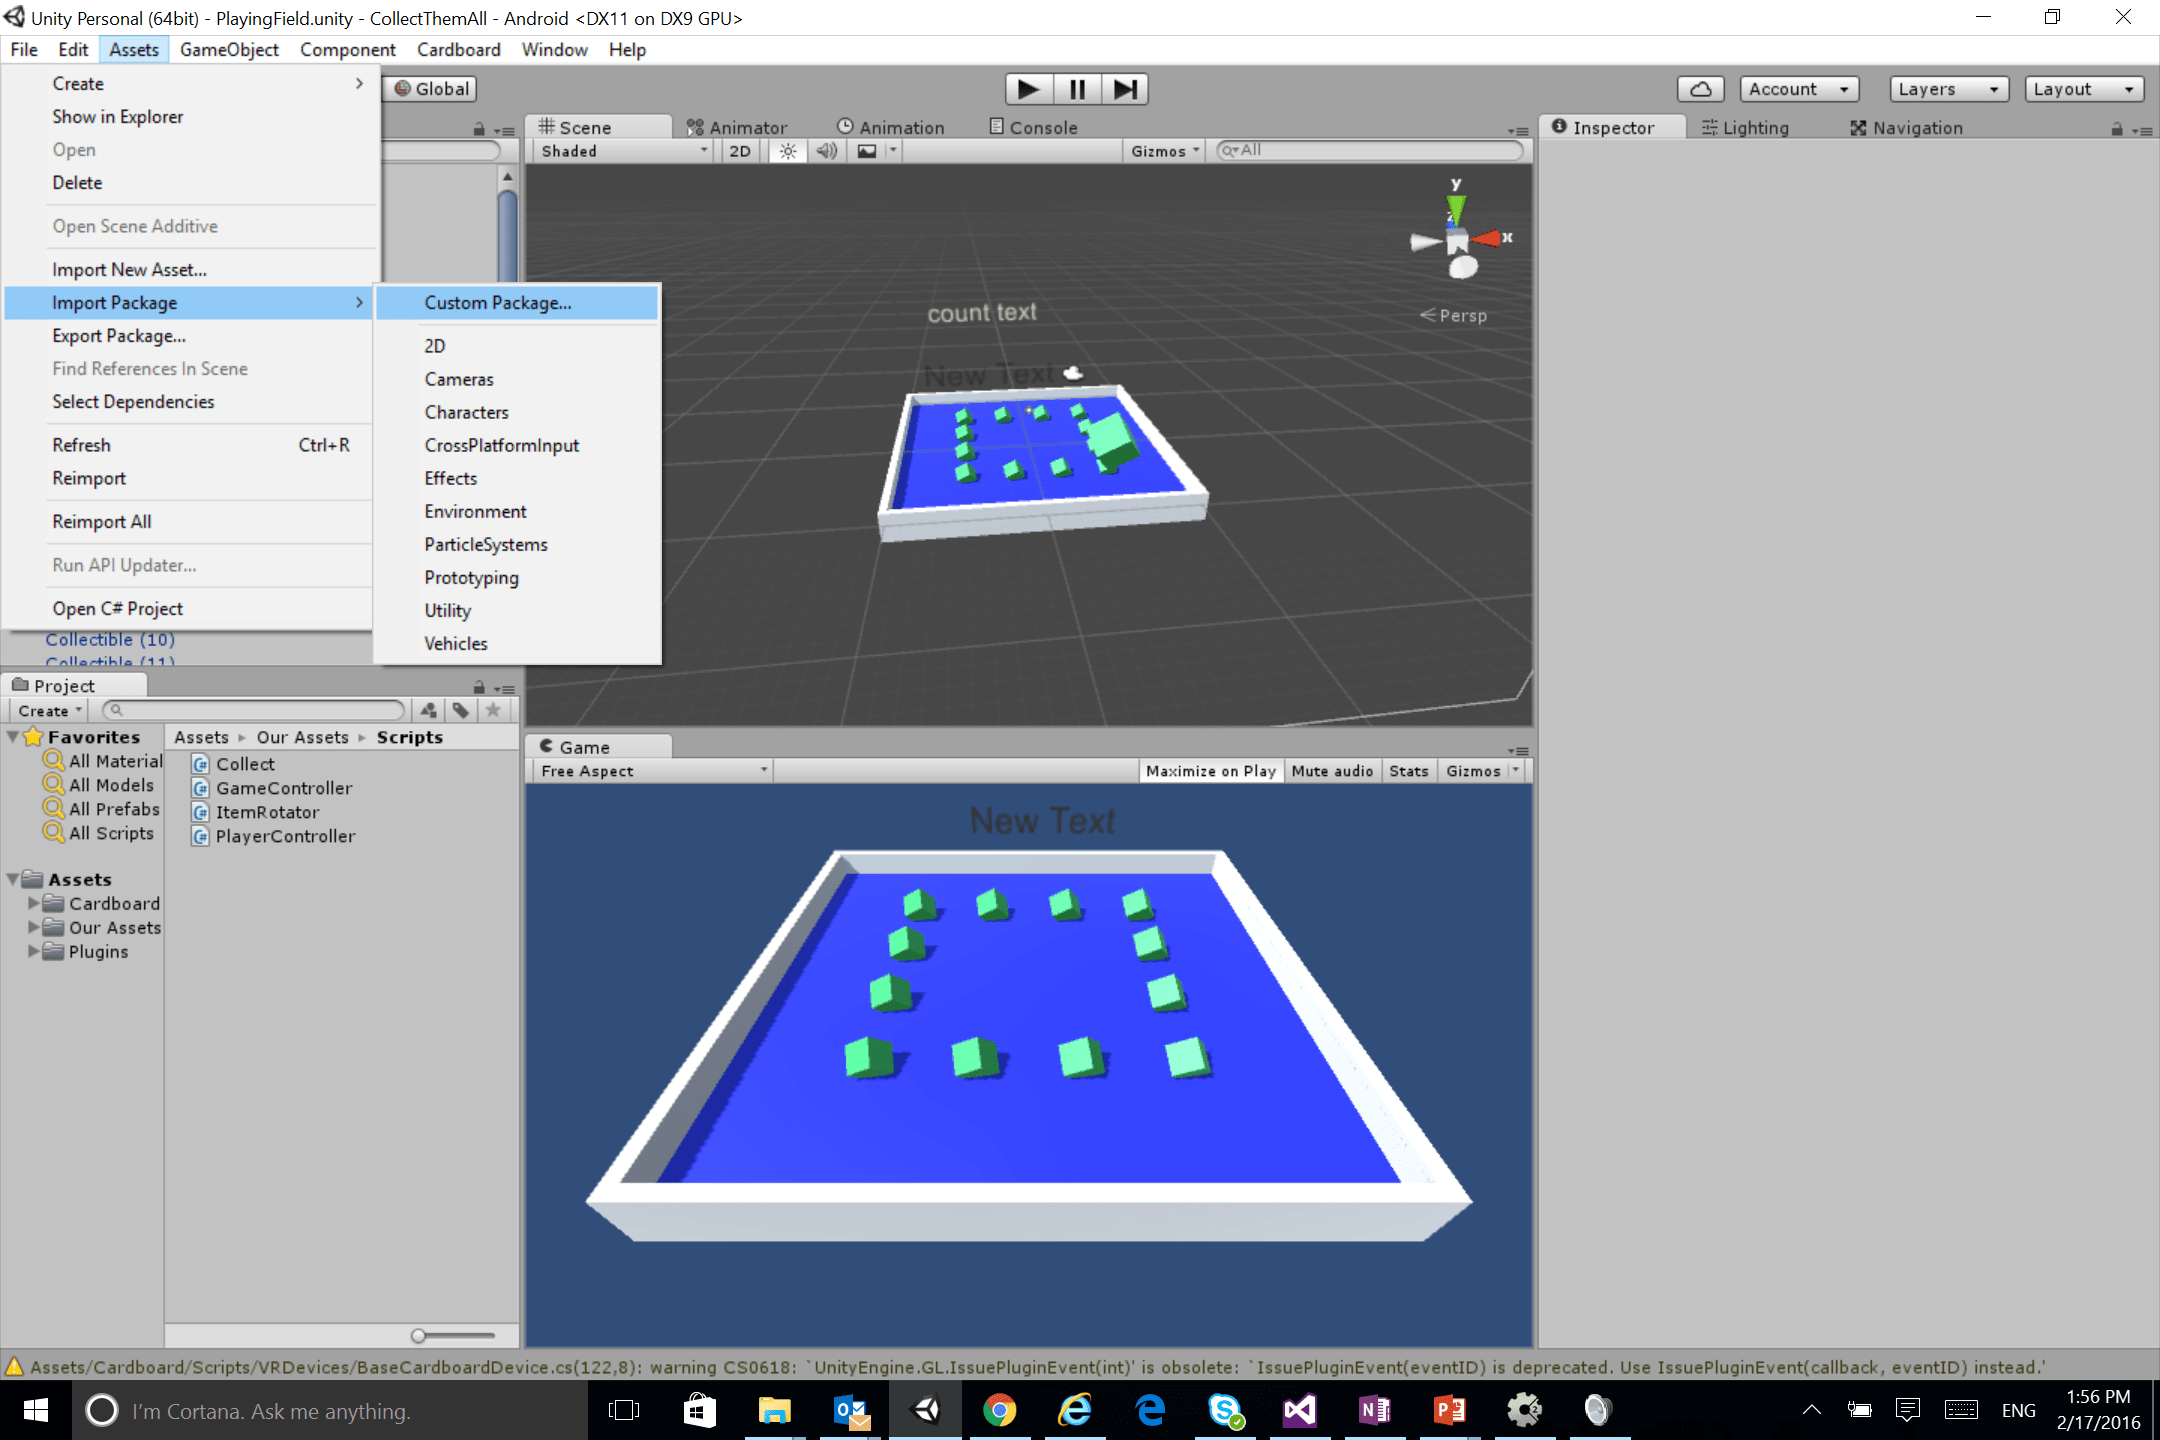 Menu for importing the Cardboard assets
- Create a new folder under Assets (next to the Cardboard folder) called “Our Assets”. This will distinguish anything we create for the game from the Cardboard assets we use.
3. Make a folder in “Our Assets” named “Scenes”. Save our scene (ctrl+S) and name it something along the lines of PlayingField.
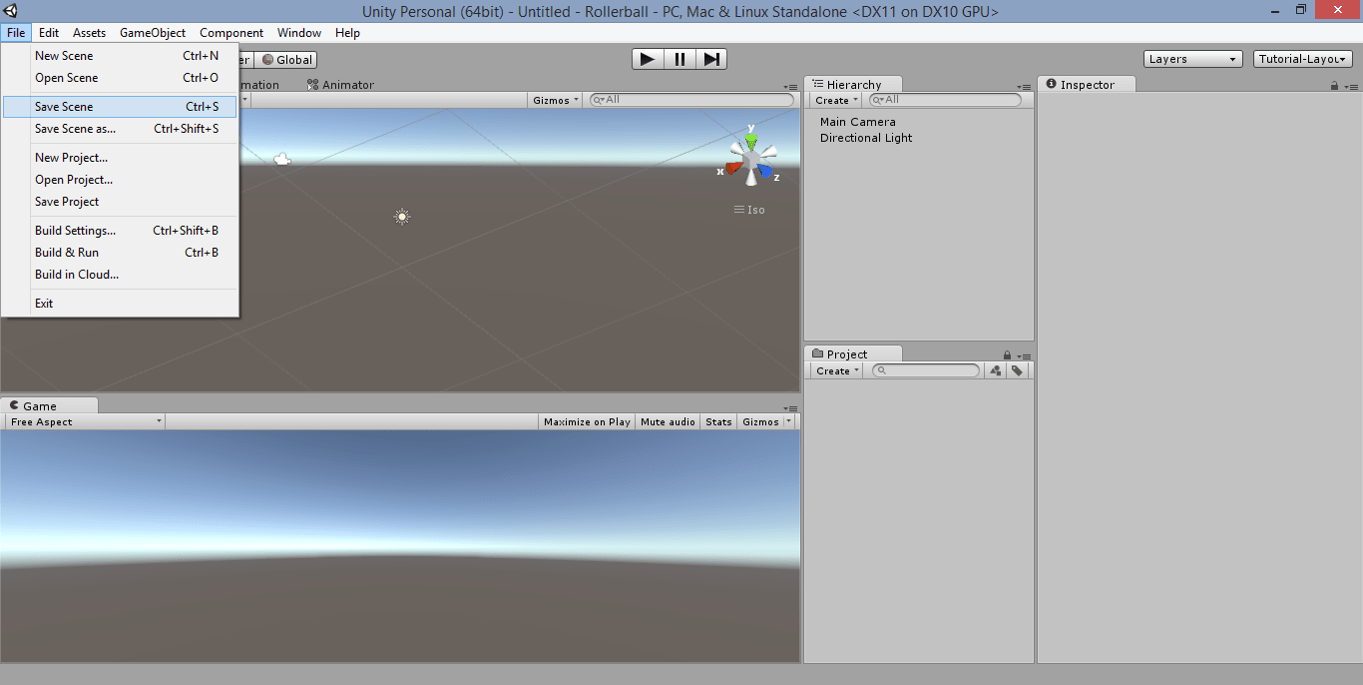 Saving the scene
4. Create a Plane for the ground.
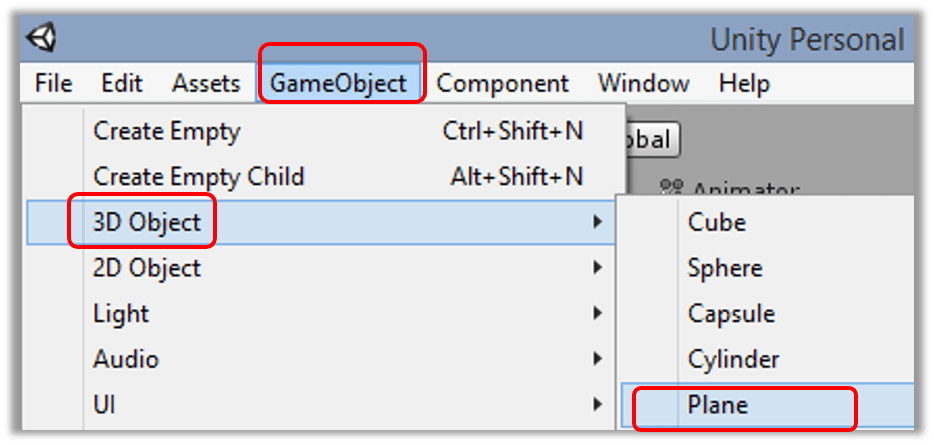 Creating a plane
- Rename this plane to “Ground”.
Change position and scale
- Change position to 0,0,0; and scale to 2,1,2.
5. Create the borders
- Create a 3D cube.
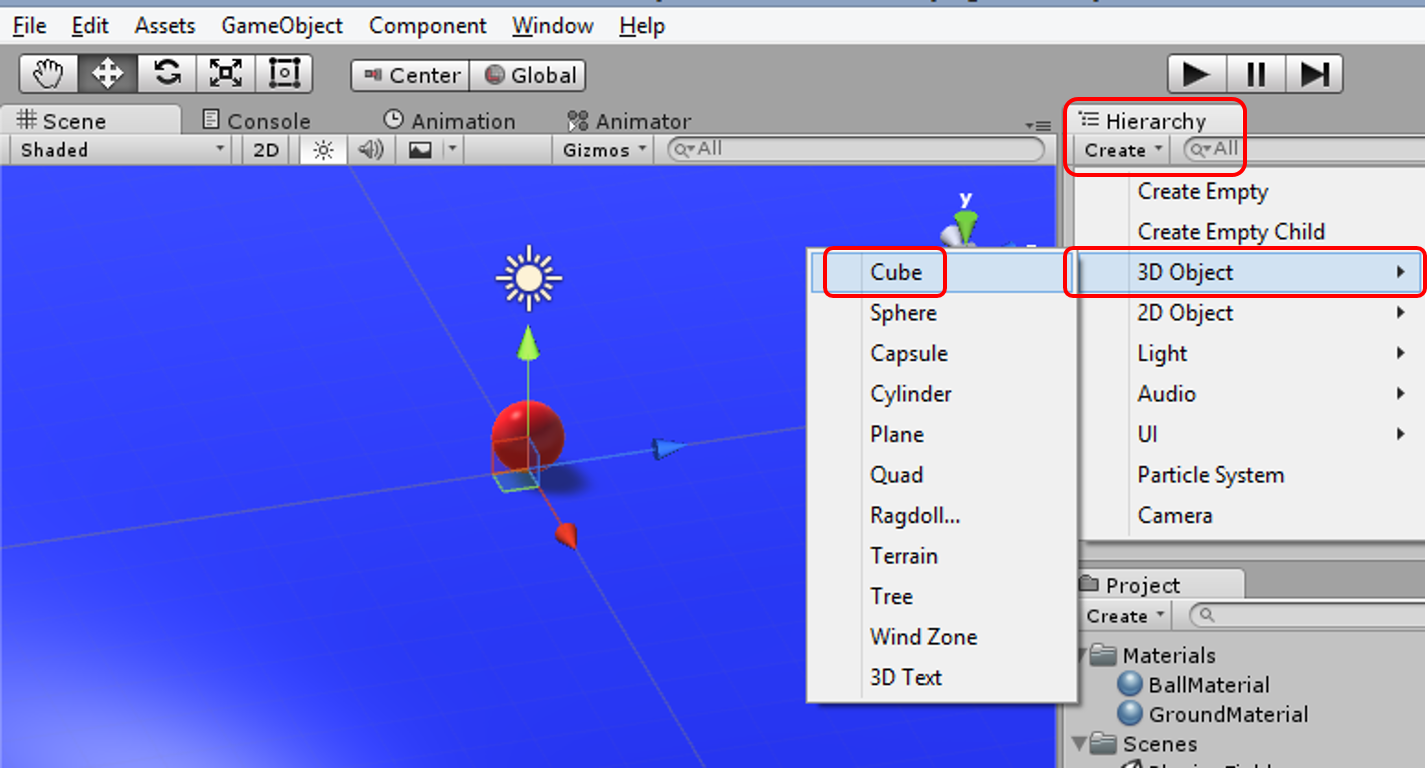 Yes the red thing is a sphere not a cube. Please make a cube not a sphere.
- Rename the cube to LeftBorder. Set it’s position to -10, 0, 0; and its scale to 0.5,2, 20.5.
- Duplicate LeftBorder and rename it to RightBorder. Change its position to 10, 0, 0; and its scale to 0.5, 2, 20.5.
- Duplicate RightBorder and rename it to FarBorder. Change its position to 0, 0, 10; and its scale to 20.5, 2, 0.5.
- Duplicate FarBorder and rename it to NearBorder. Change its position to 0, 0, -10; and its scale to 20.5, 2, 0.5.
- Create an empty GameObject (under GameObject -> create empty). Rename it to Borders.
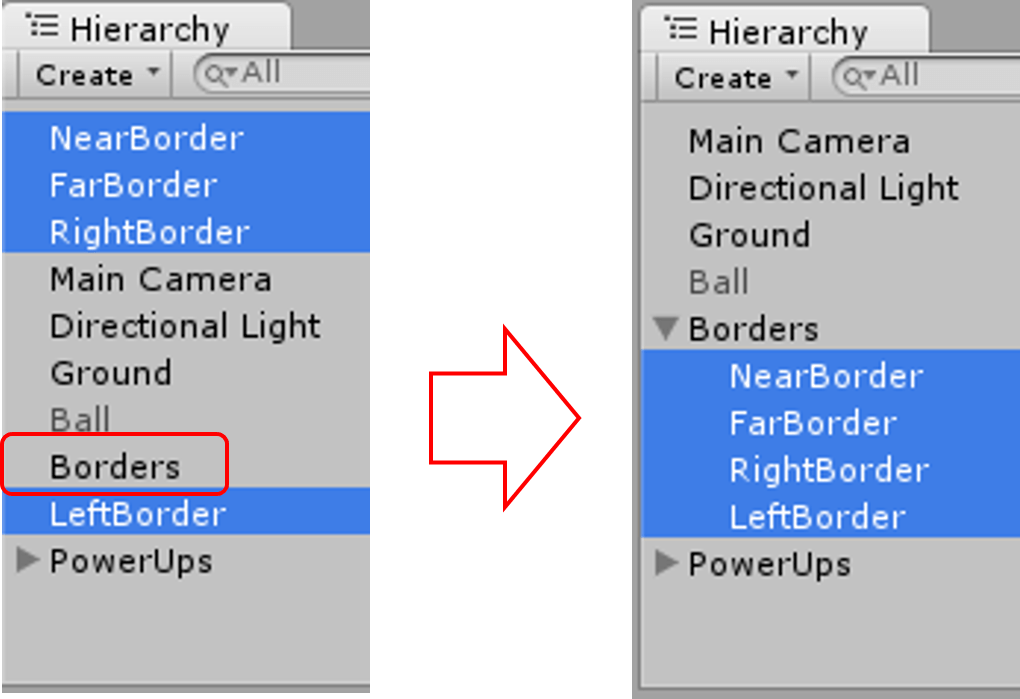 Grouping the borders
- Drag them under empty game object. They should collapse and expand under Borders.
6. Materials
- Create new folder under “Our Assets” called “Materials”.
- Create 2 materials called “GroundMaterial” and “CollectableMaterial”.
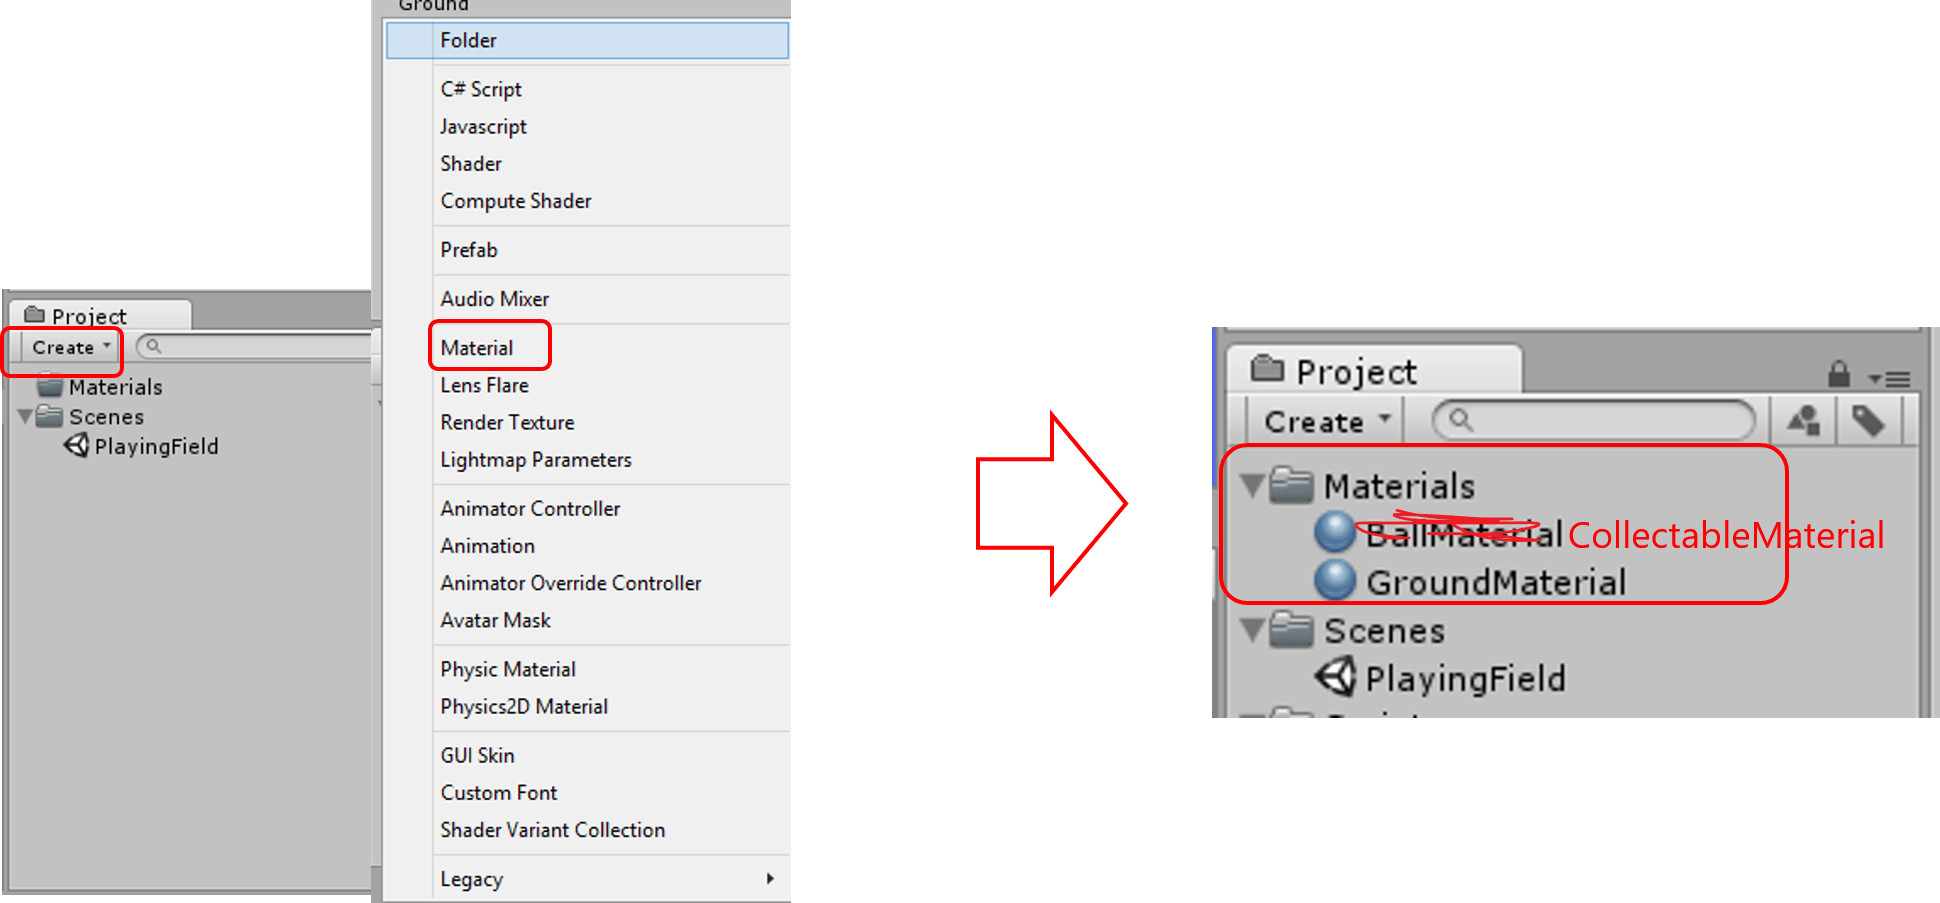 Creating a material
- Give them colors. Drag “GroundMaterial” onto the ground plane. You should see the ground change to that color.
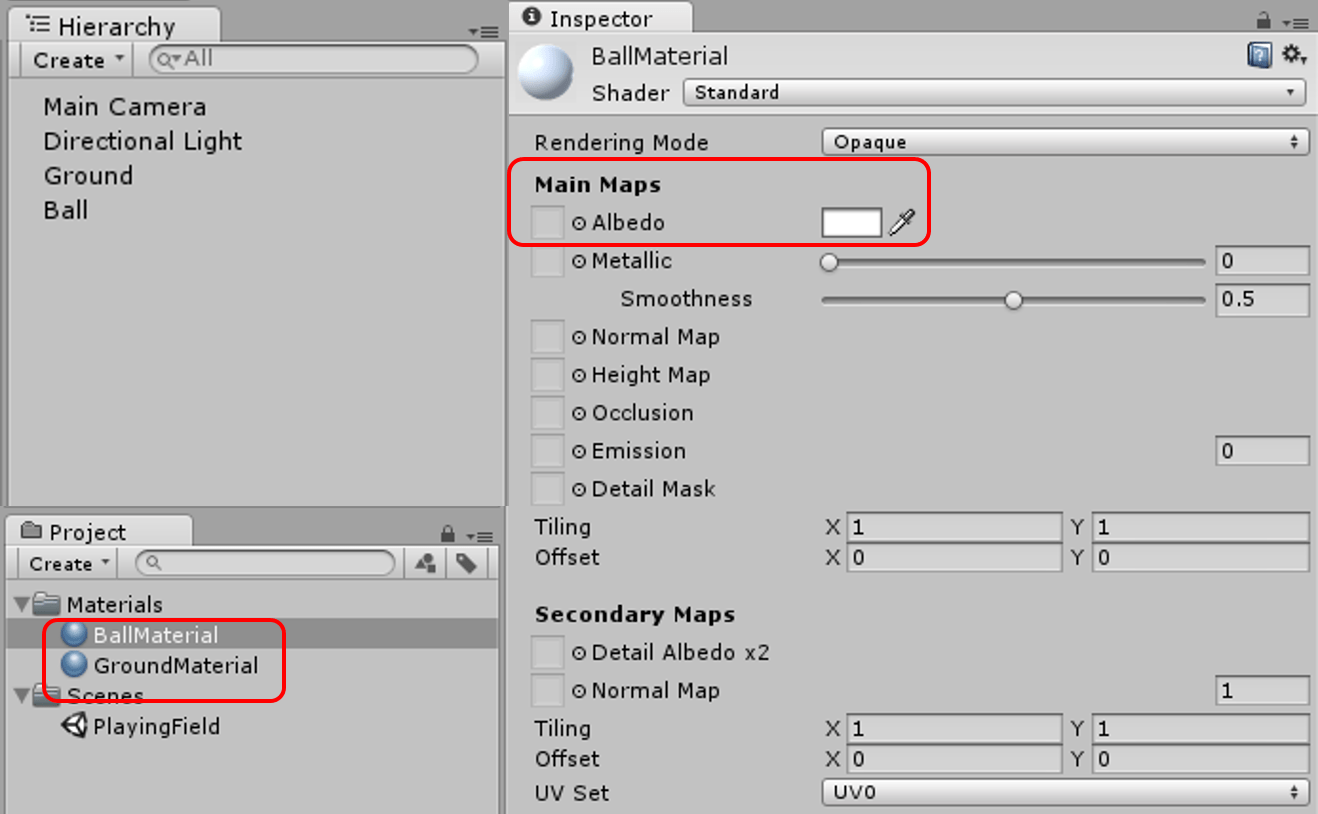 Assigning a color
7. Locate Directional Light on the Hierarchy.
- Update it’s rotation to 50, 60, 0.
- Our playing field should now be illuminated.
Creating the Collectible
1. Create another 3D cube.
- Name it Collectible and update its position to 0, 0.5, 0; and its rotation to 45, 45, 45.
2. Create folder in “Our Assets” named “Scripts”.
- Create a new C# script in this folder (Under the Project tab go to Create -> C# script).
- Name the script ItemRotator.
- Double click on the script to launch your editor. On my Windows computer I use Visual Studio as the editor.
- Add this line of code under the Update() function. This code constantly rotates the collectible.
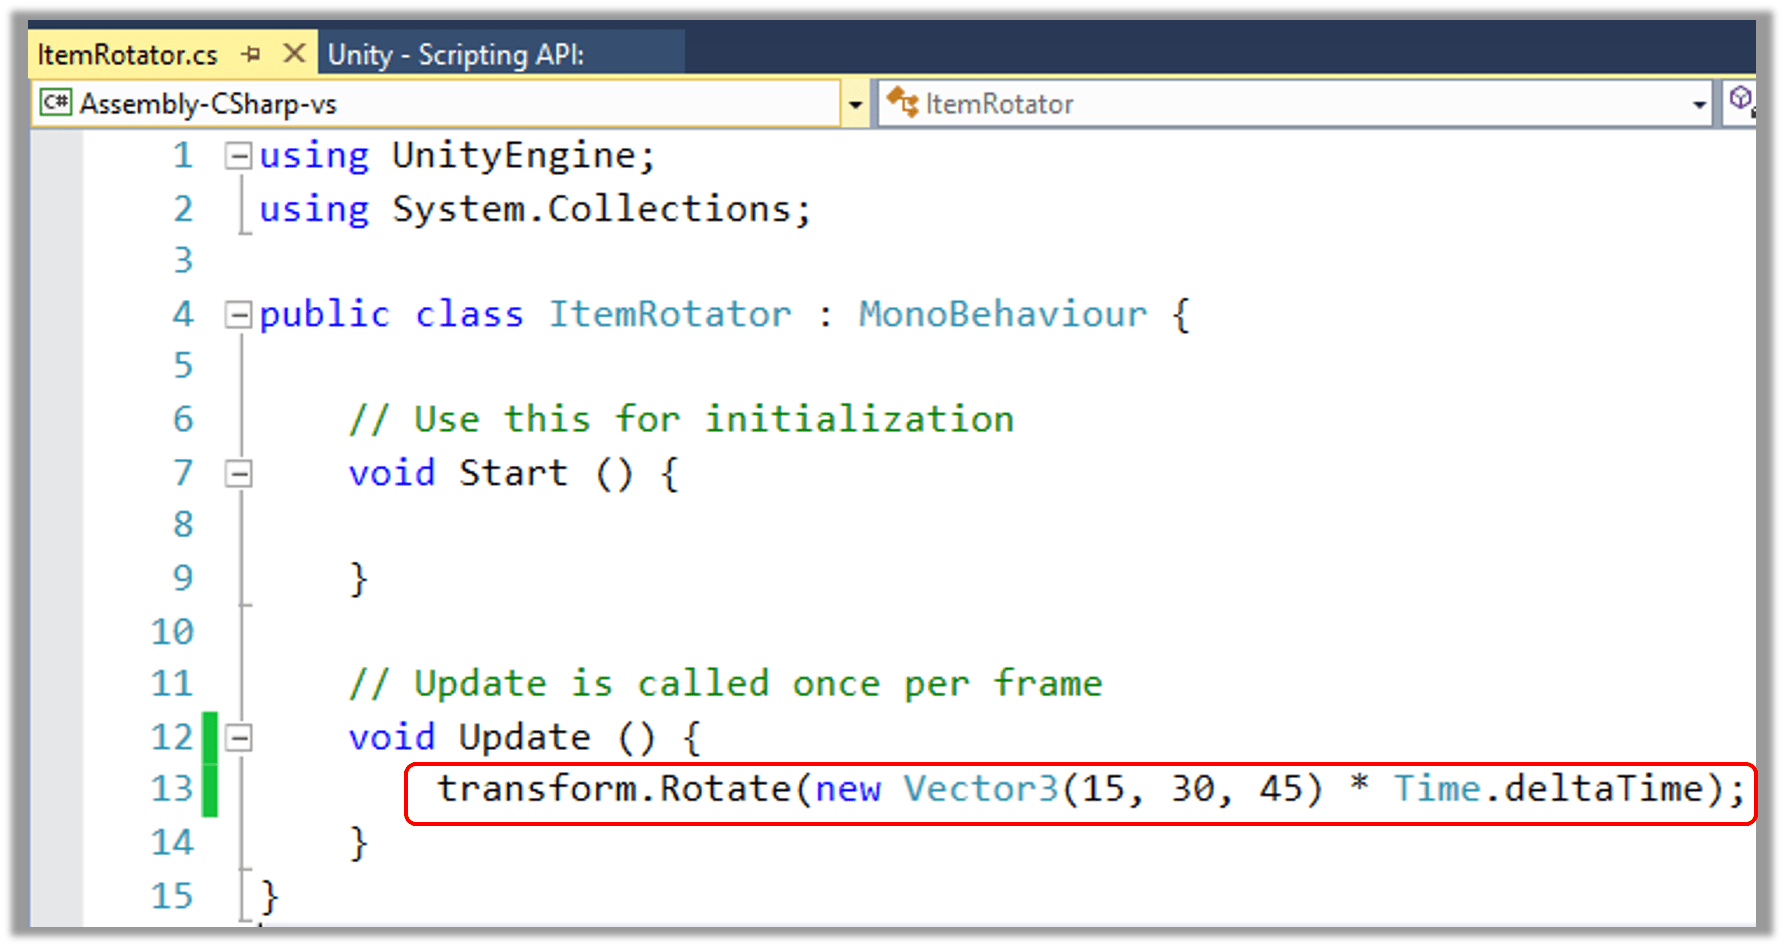
- Drag the ItemRotator script onto our Collectible 3D cube.
3. Create a new folder in “Our Assets” named “Prefabs”.
- Definition: A prefab is a special kind of asset in Unity that allows you to store a GameObject as a kind of template, from which you can create new instances in your scene. You can make instances unique by editing each instance individually, or you can make changes to the template by editing the prefab.
4. Drag the Collectible cube into the “Prefabs” folder.
- This turns the collectible into a prefab.
- Create 12 collectibles and position them in the field.
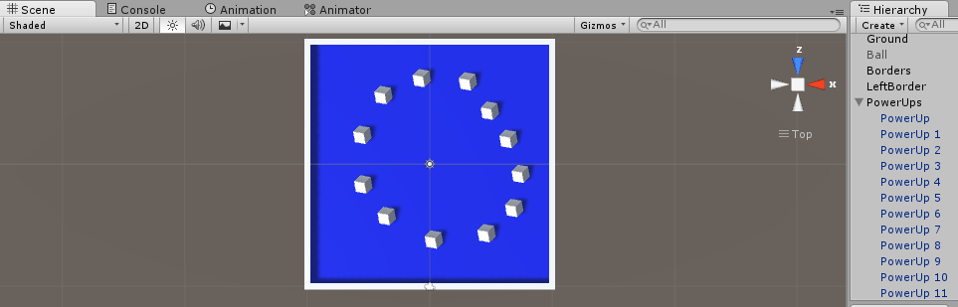 A field of collectibles
- Drag “CollectibleMaterial” onto the Collectible in the prefabs folder. You should see all the collectibles change color since you modified the prefab (template).
Make Your Game Cardboard Accessible
1. In the “Prefabs” folder in “Cardboard“, drag “CardboardMain” into the Hierarchy.
- This will be our our special VR camera.
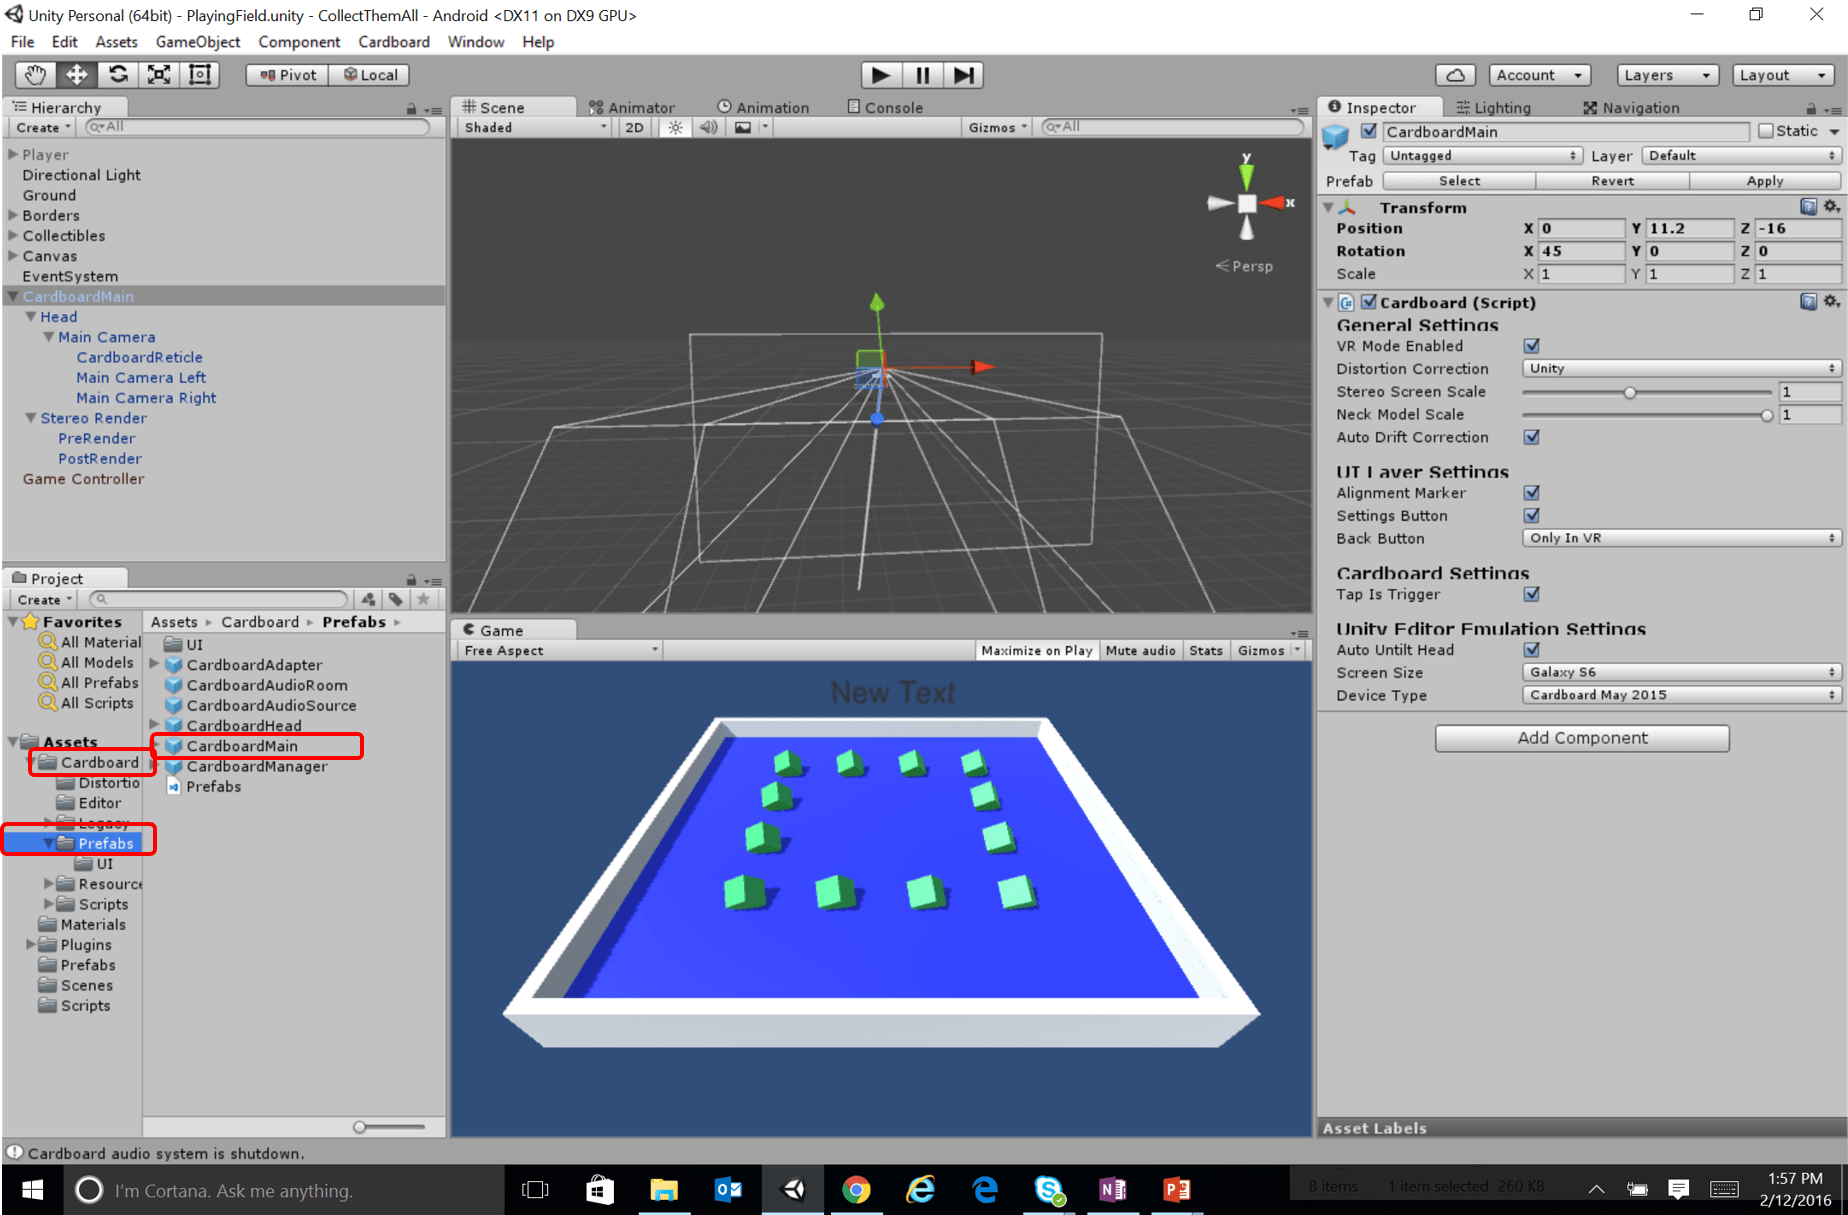 Drag CardboardMain into the Hierarchy
2. Drop down CardboardMain, and under that drop down Head.
- Select Main Camera and add a Physics Raycaster (under the Add Component > Event > Physics Raycaster) so we can interact with 3D objects in the scene.
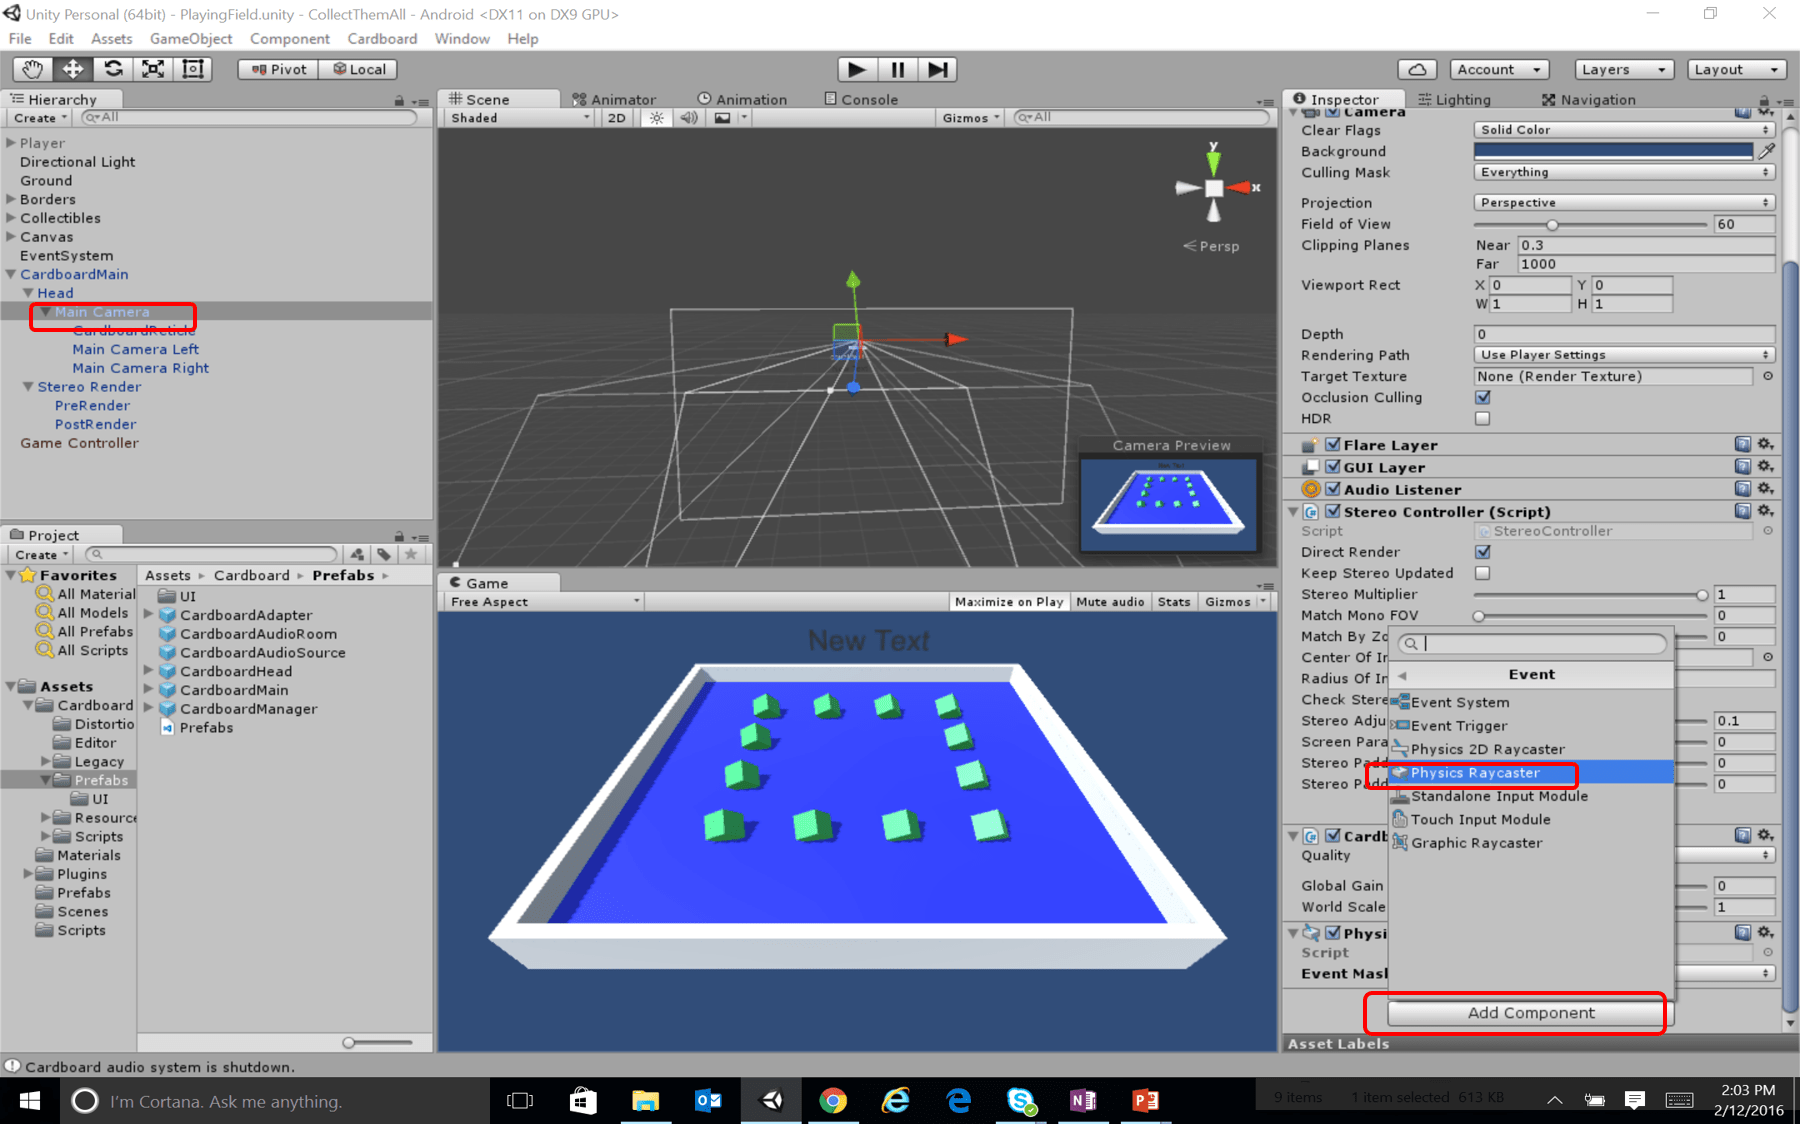 Add a Physics Raycaster
3. In “Cardboard” > “Prefabs” > “UI” drag “CardboardReticle” to child under Main Camera.
- This will give us the white circle that lets us know whether we’re interacting with 3D objects.
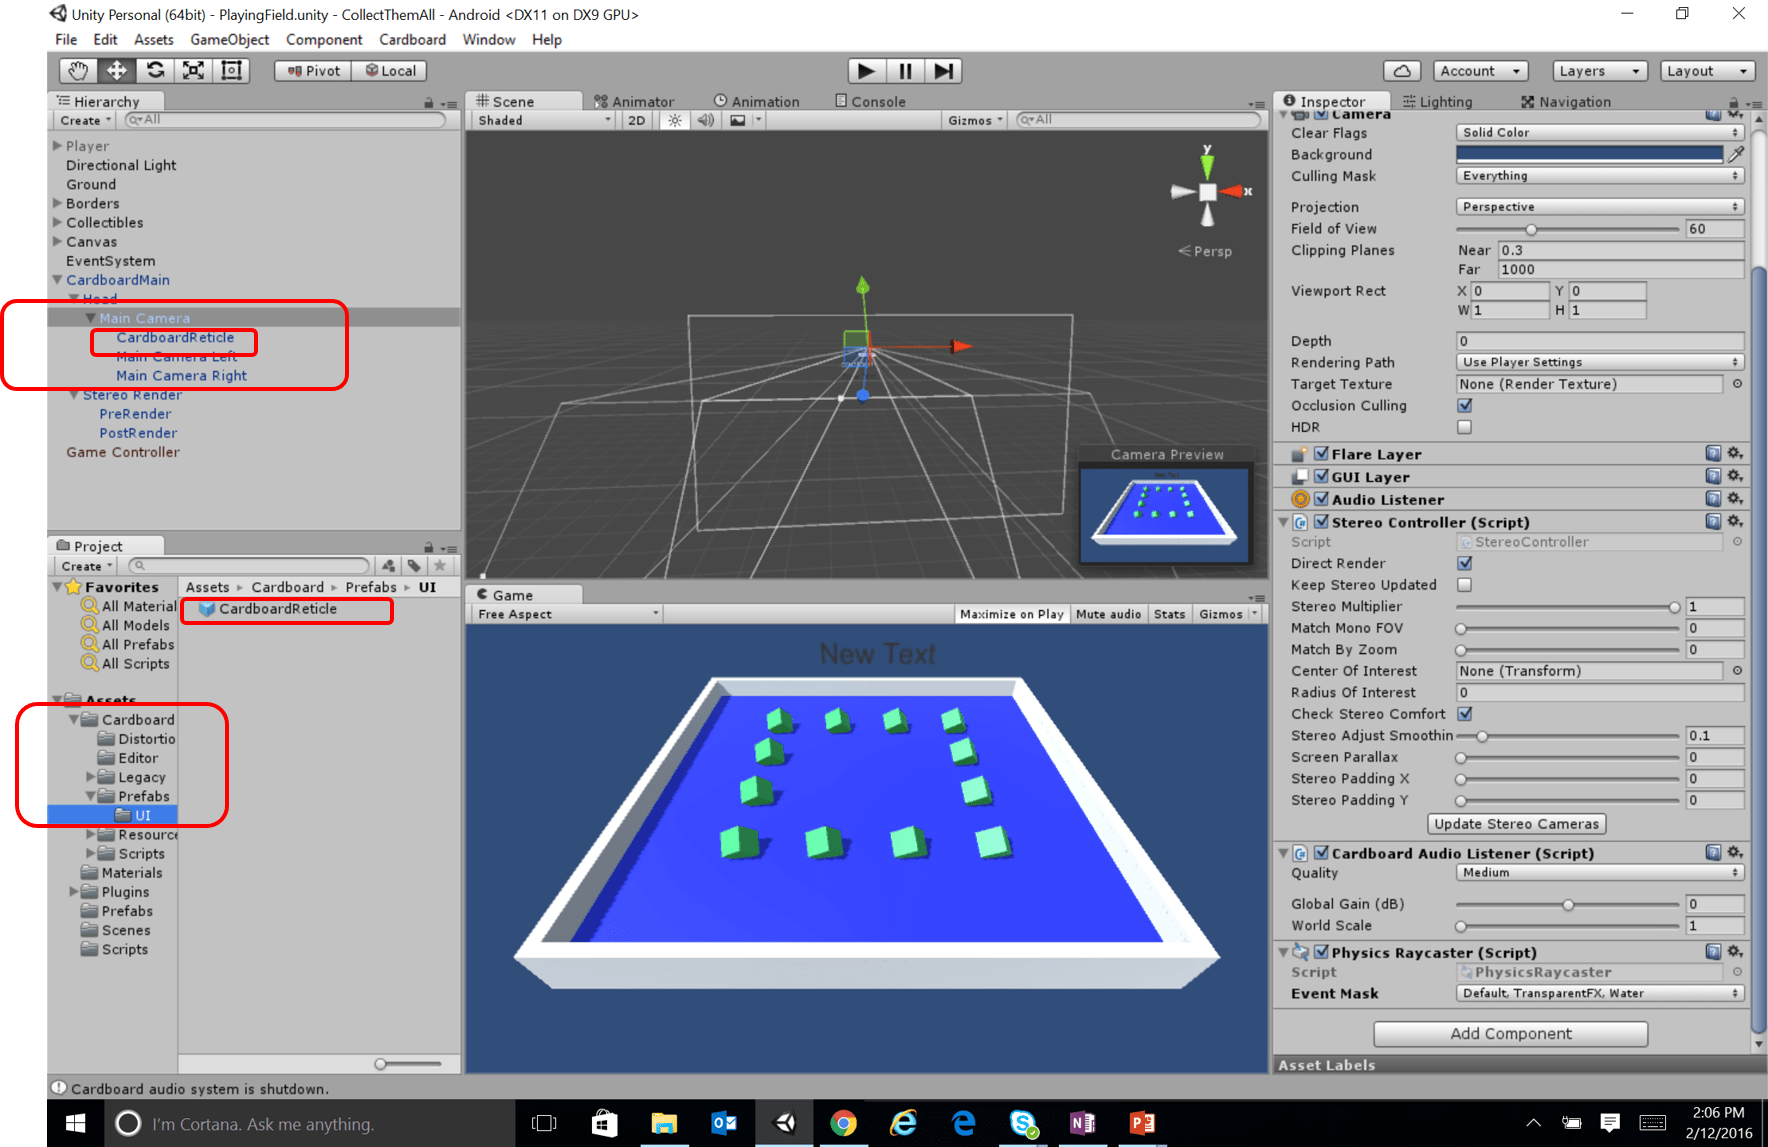 Adding the CardboardReticle
Collectible + GameController
1. Create a new C# script in the “Scripts” folder named “Collect”. Double click on Collect to edit it.
- Add code below. Start(), LateUpdate(), SetGazedAt(), and Collected(). This script will change the color of the collectible based on whether or not we’re looking at it. Red if we’re not, green if we are.
- The code in LateUpdate() will exit the application in both iOS and Android if we press the back button at the top of the screen. Collected() sets the collectible to inactive so it’ll disappear from the screen.
 Code for Collect script
- Drag Collect onto the Collectible prefab.
2. Add an Event Trigger component (Add Component > Event > Event Trigger).
- Pointer Enter and Exit should be set to Collect.SetGazedAt() and Pointer Click should be set to Collect.Collected().
- See picture below if confused.
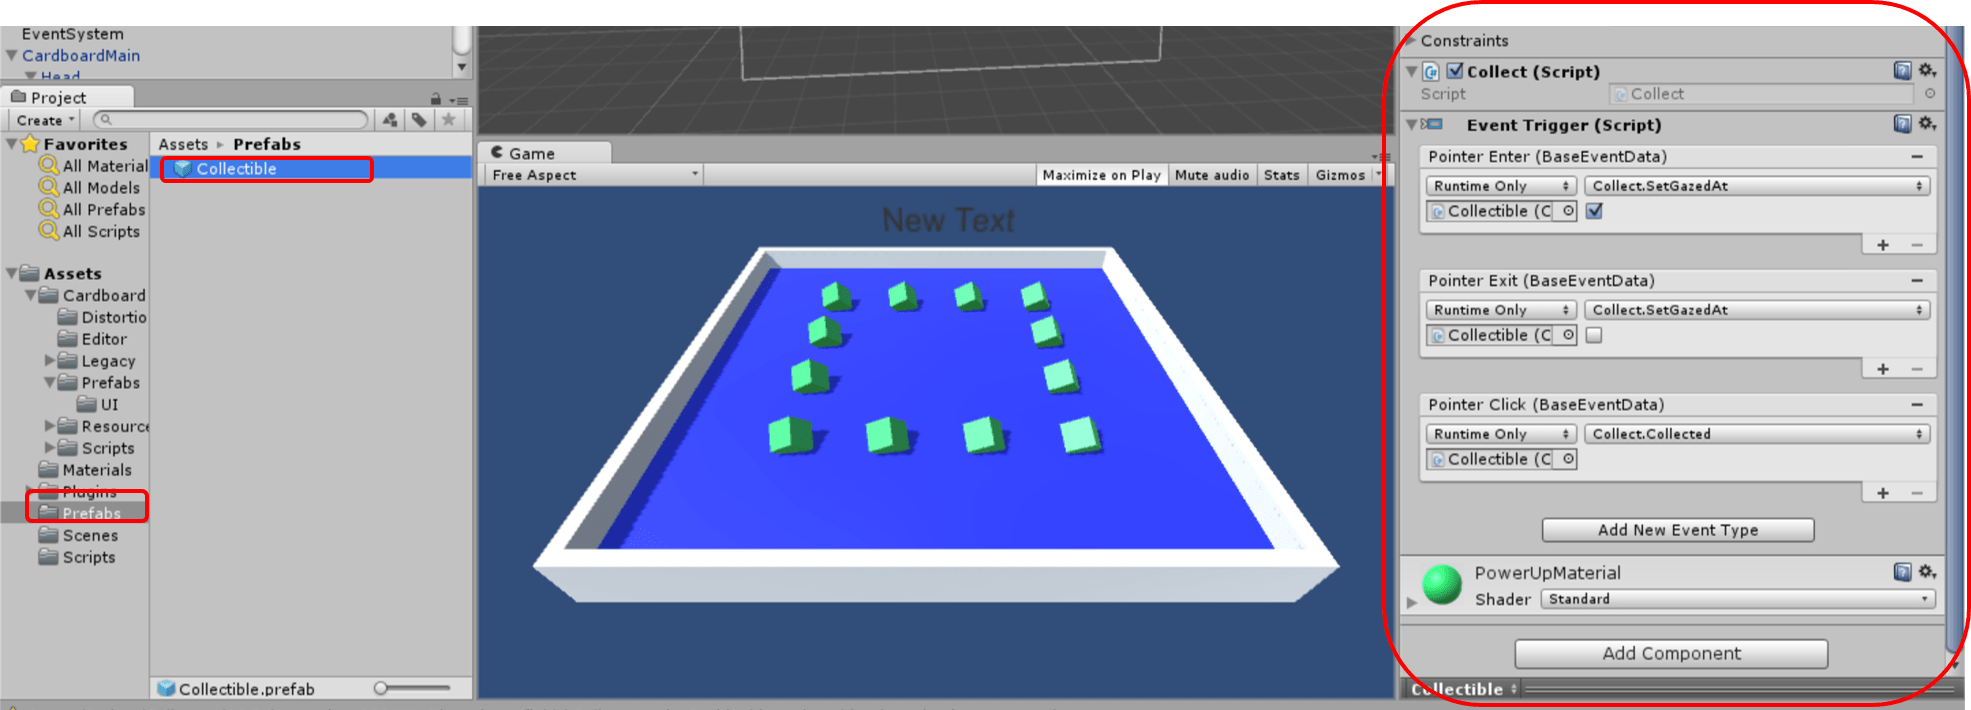 Event Trigger
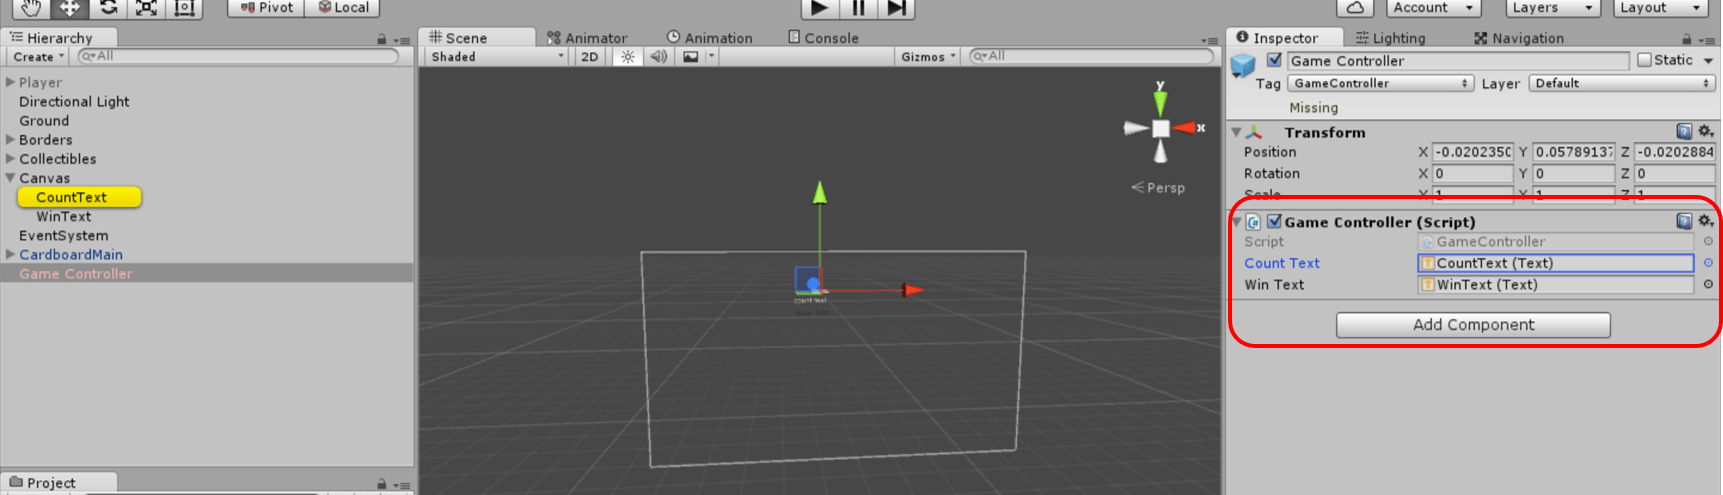
3. Create a new empty Game Object called Game Controller.
- Create a new C# script in the “Scripts” folder named GameController and drag it onto the Game Controller object.
- Tag Game Controller with “GameController” tag.
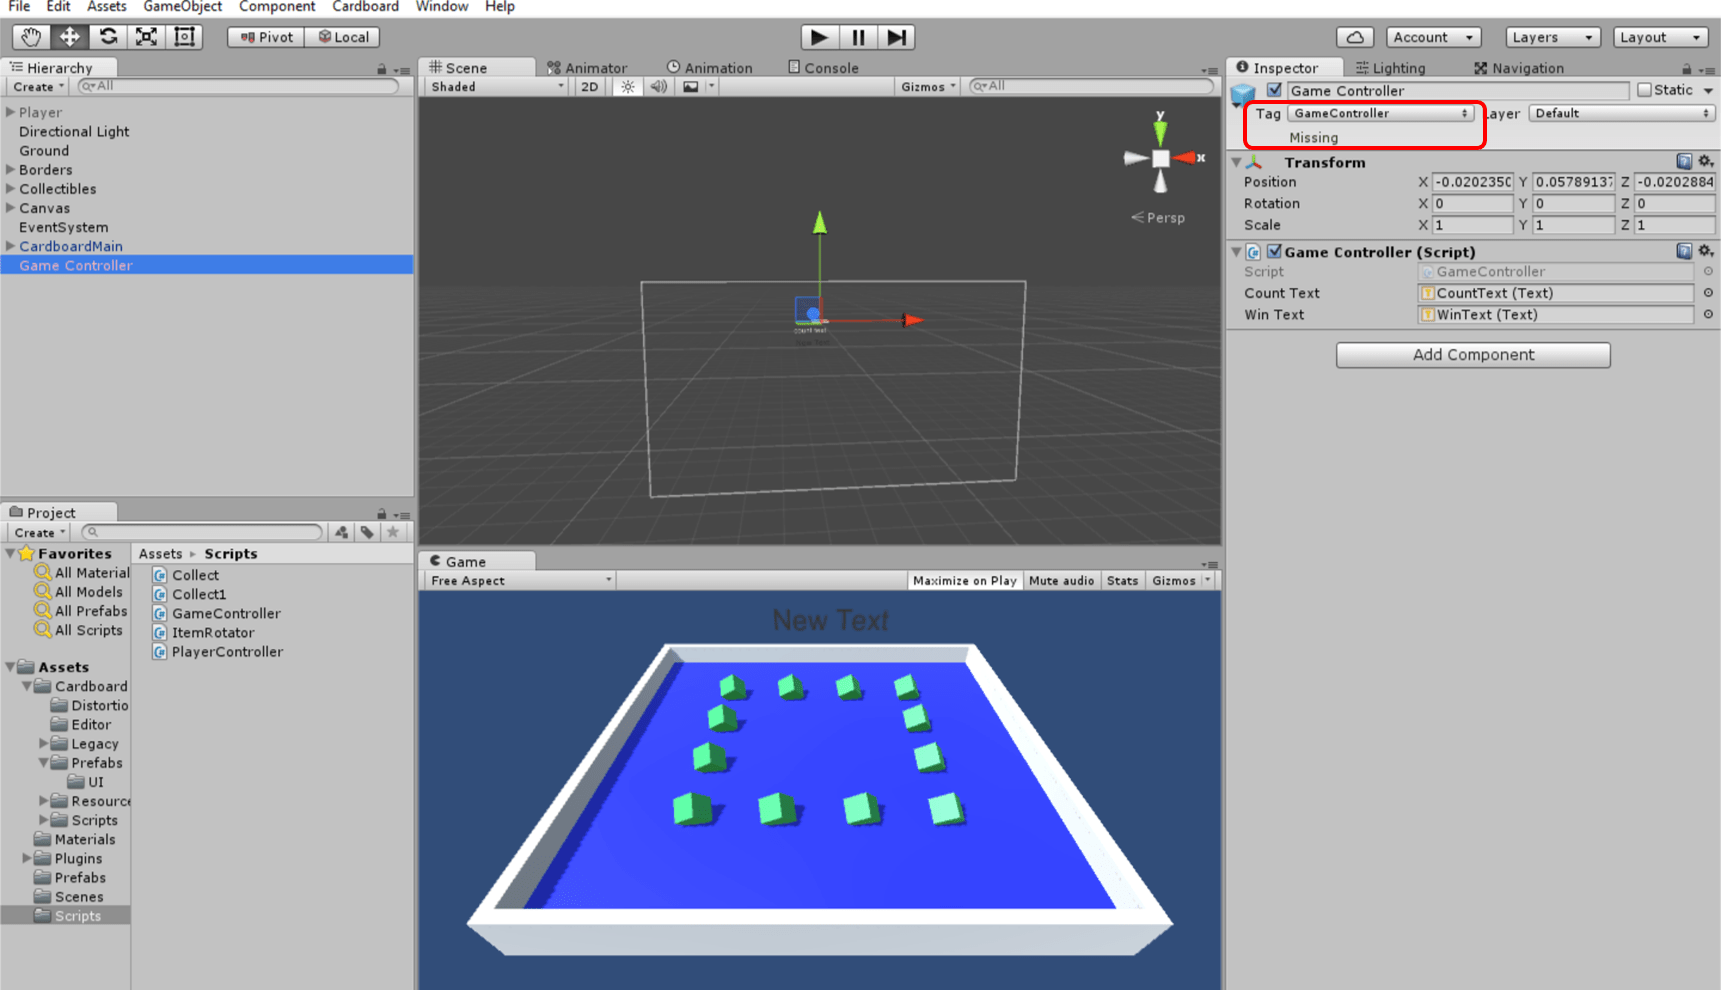 GameController tag
- Double click on the GameController script to edit it.
- Edit the code to look like below. Don’t forget to import UnityEngine.UI; at the top. The Text objects will hold the score counter and “you win” message. SetCountText() writes the score counter and win text to the screen.
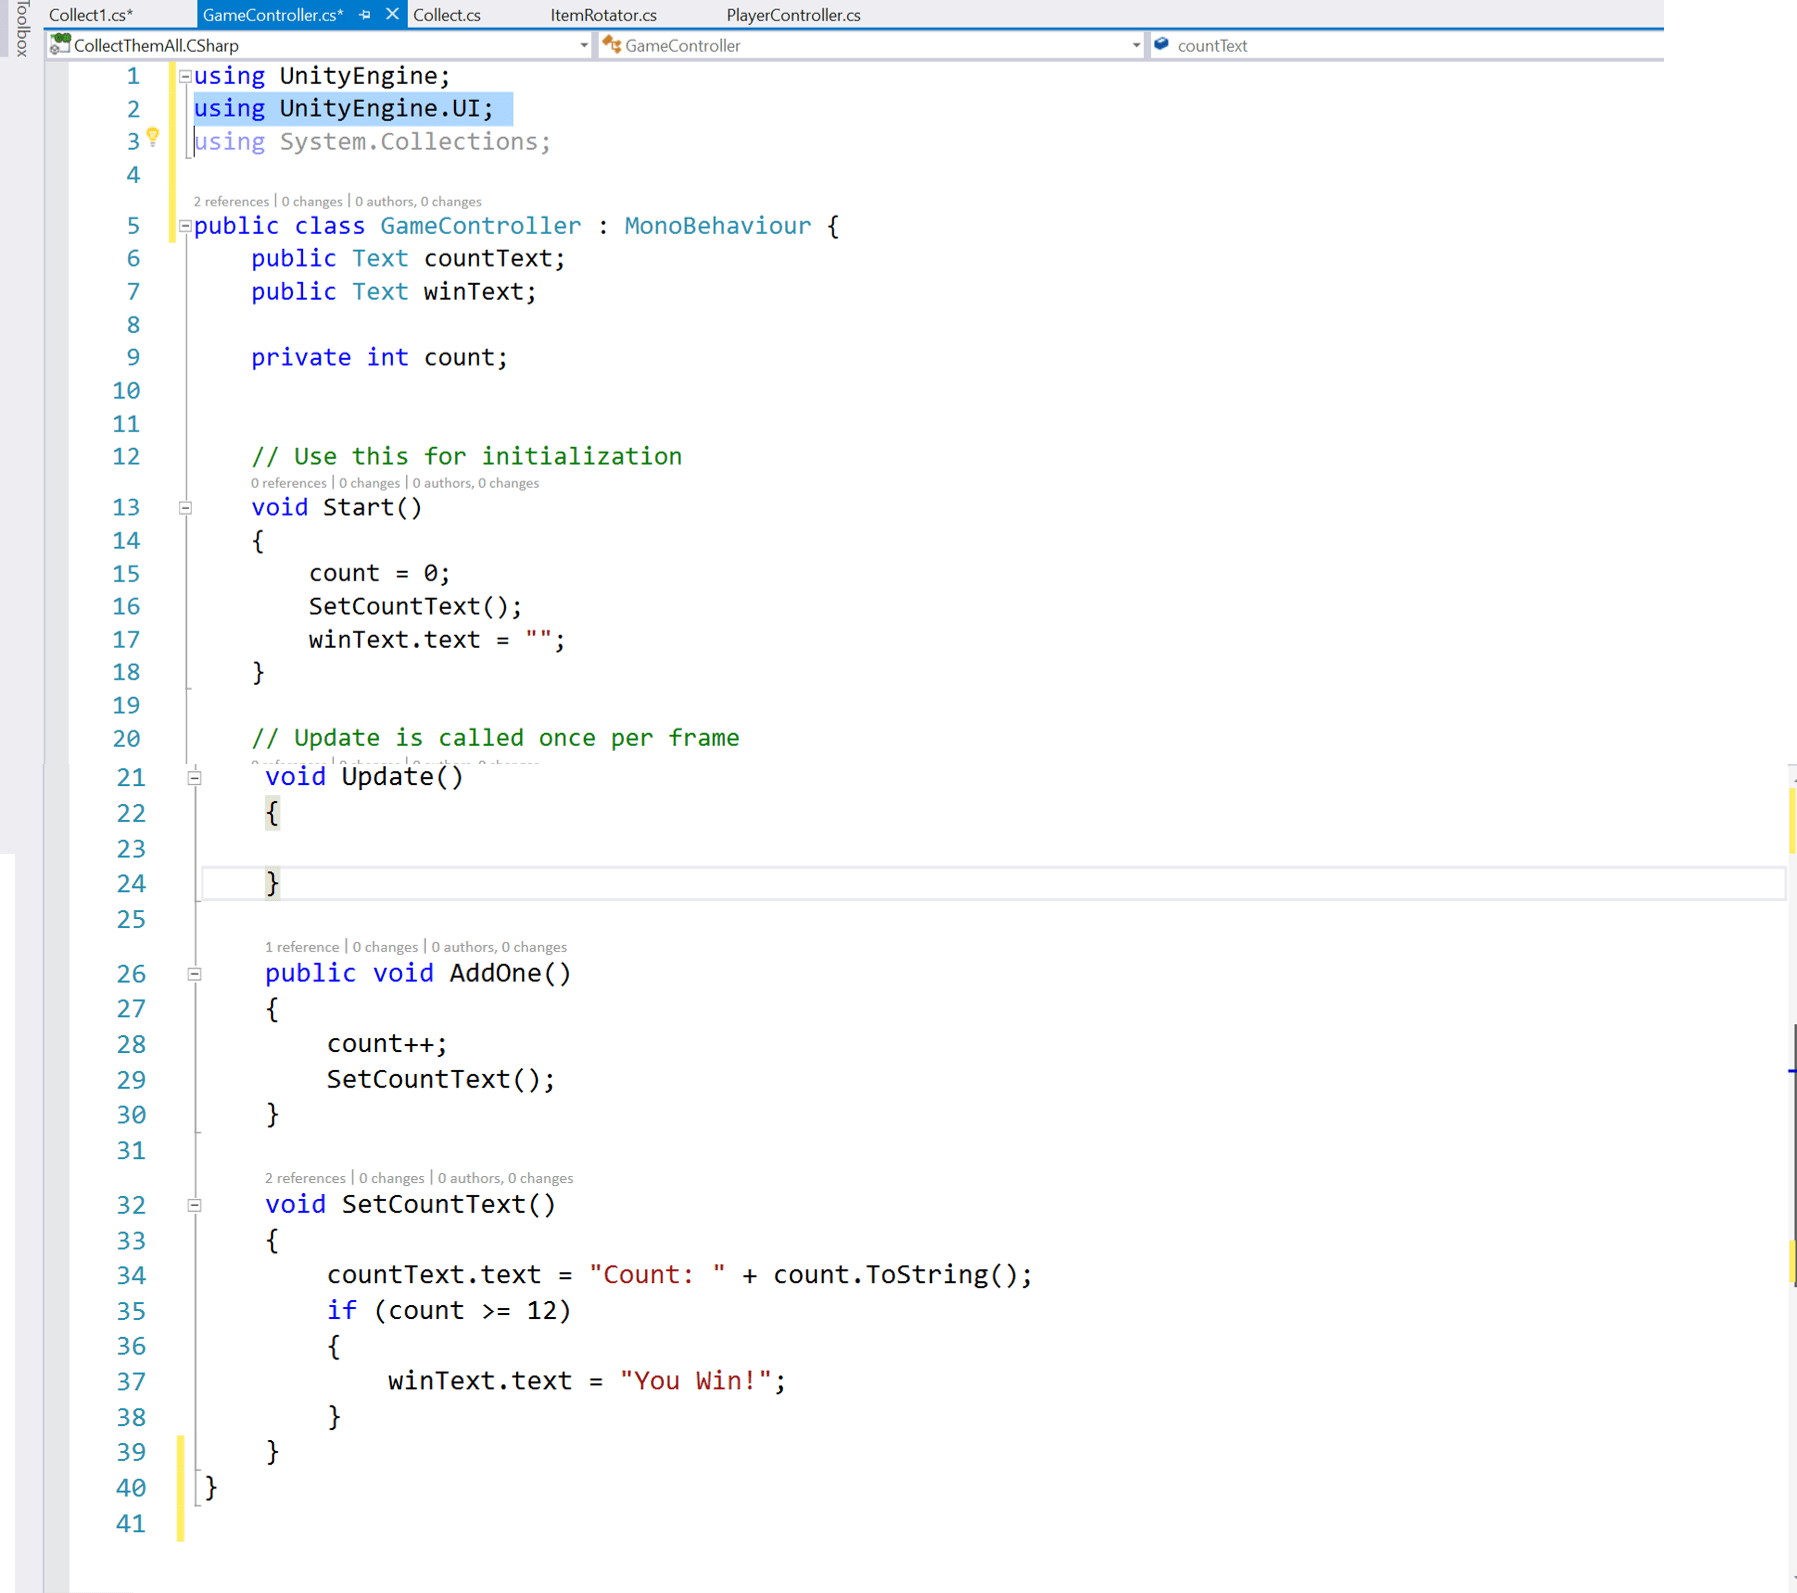 Code for Game Controller
- Back in Unity, if you click on the Game Controller object and look in the inspector, you can see how Count Text and Win Text appear as boxes where you can set objects.
4. Create UI Text element (In GameObject> UI> Text).
- You can see in the Hierarchy that Canvas and EventSystem were created.
- Rename Text to CountText. Create another UI Text element with the name WinText.
- Drag these onto the respective slots in Game Controller (under the script).
 Dragging Text objects into proper place
5. If you click on Canvas in the Hierarchy, in the Inspector under the Canvas component, make sure the Canvas’s Render Mode is in World Space with the Event Camera set to the CardboardMain MainCamera.
- Make sure it has Canvas Scalar, Graphic Raycaster, and Event System scripts.
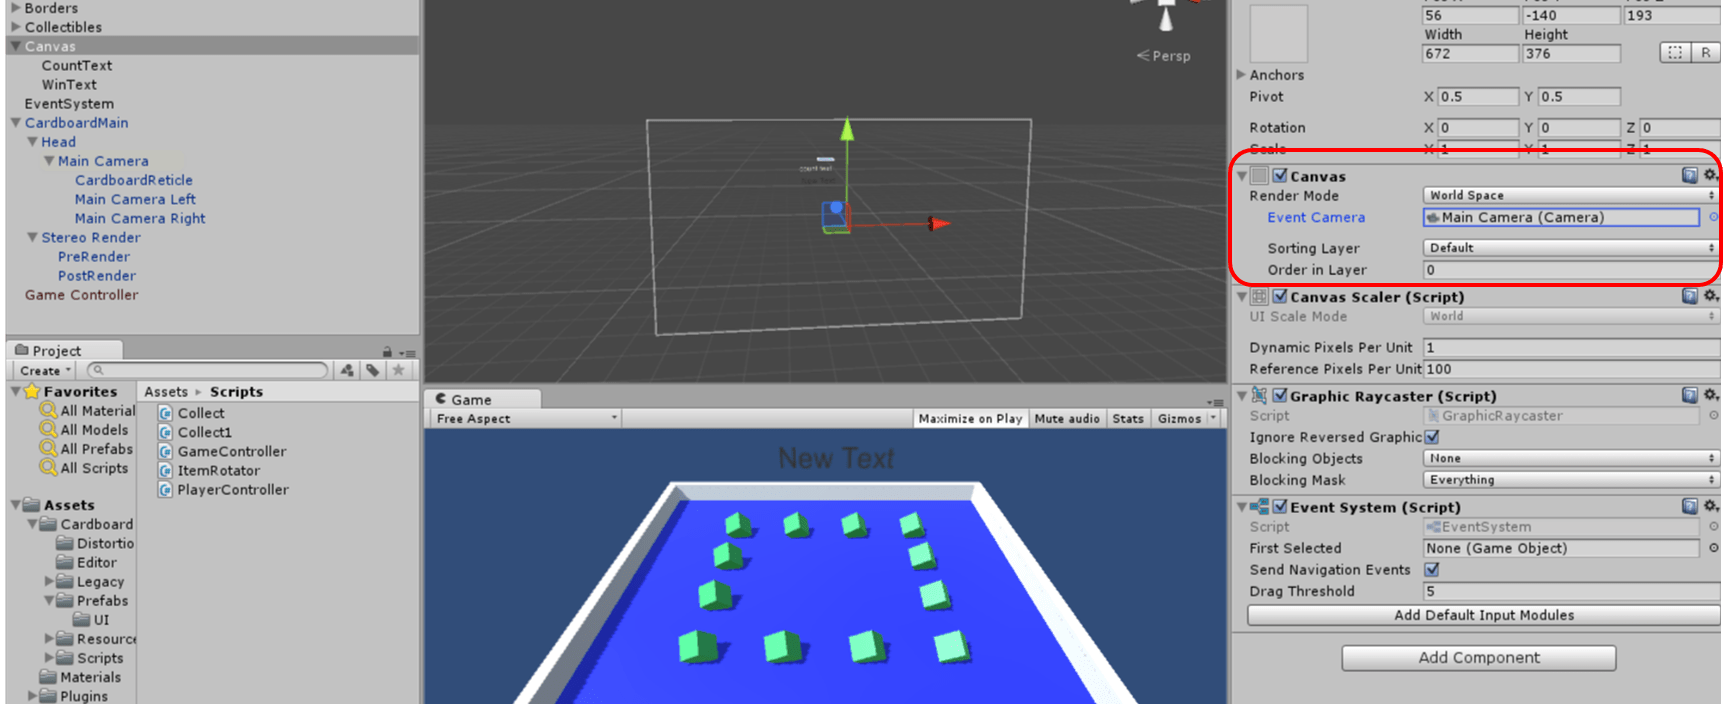 Components on Canvas
6. Click on EventSystem in the Hierarchy.
- Make sure it has the Event System, Touch Input Module, Gaze Input Module, and Standalone Input Module scripts attached.
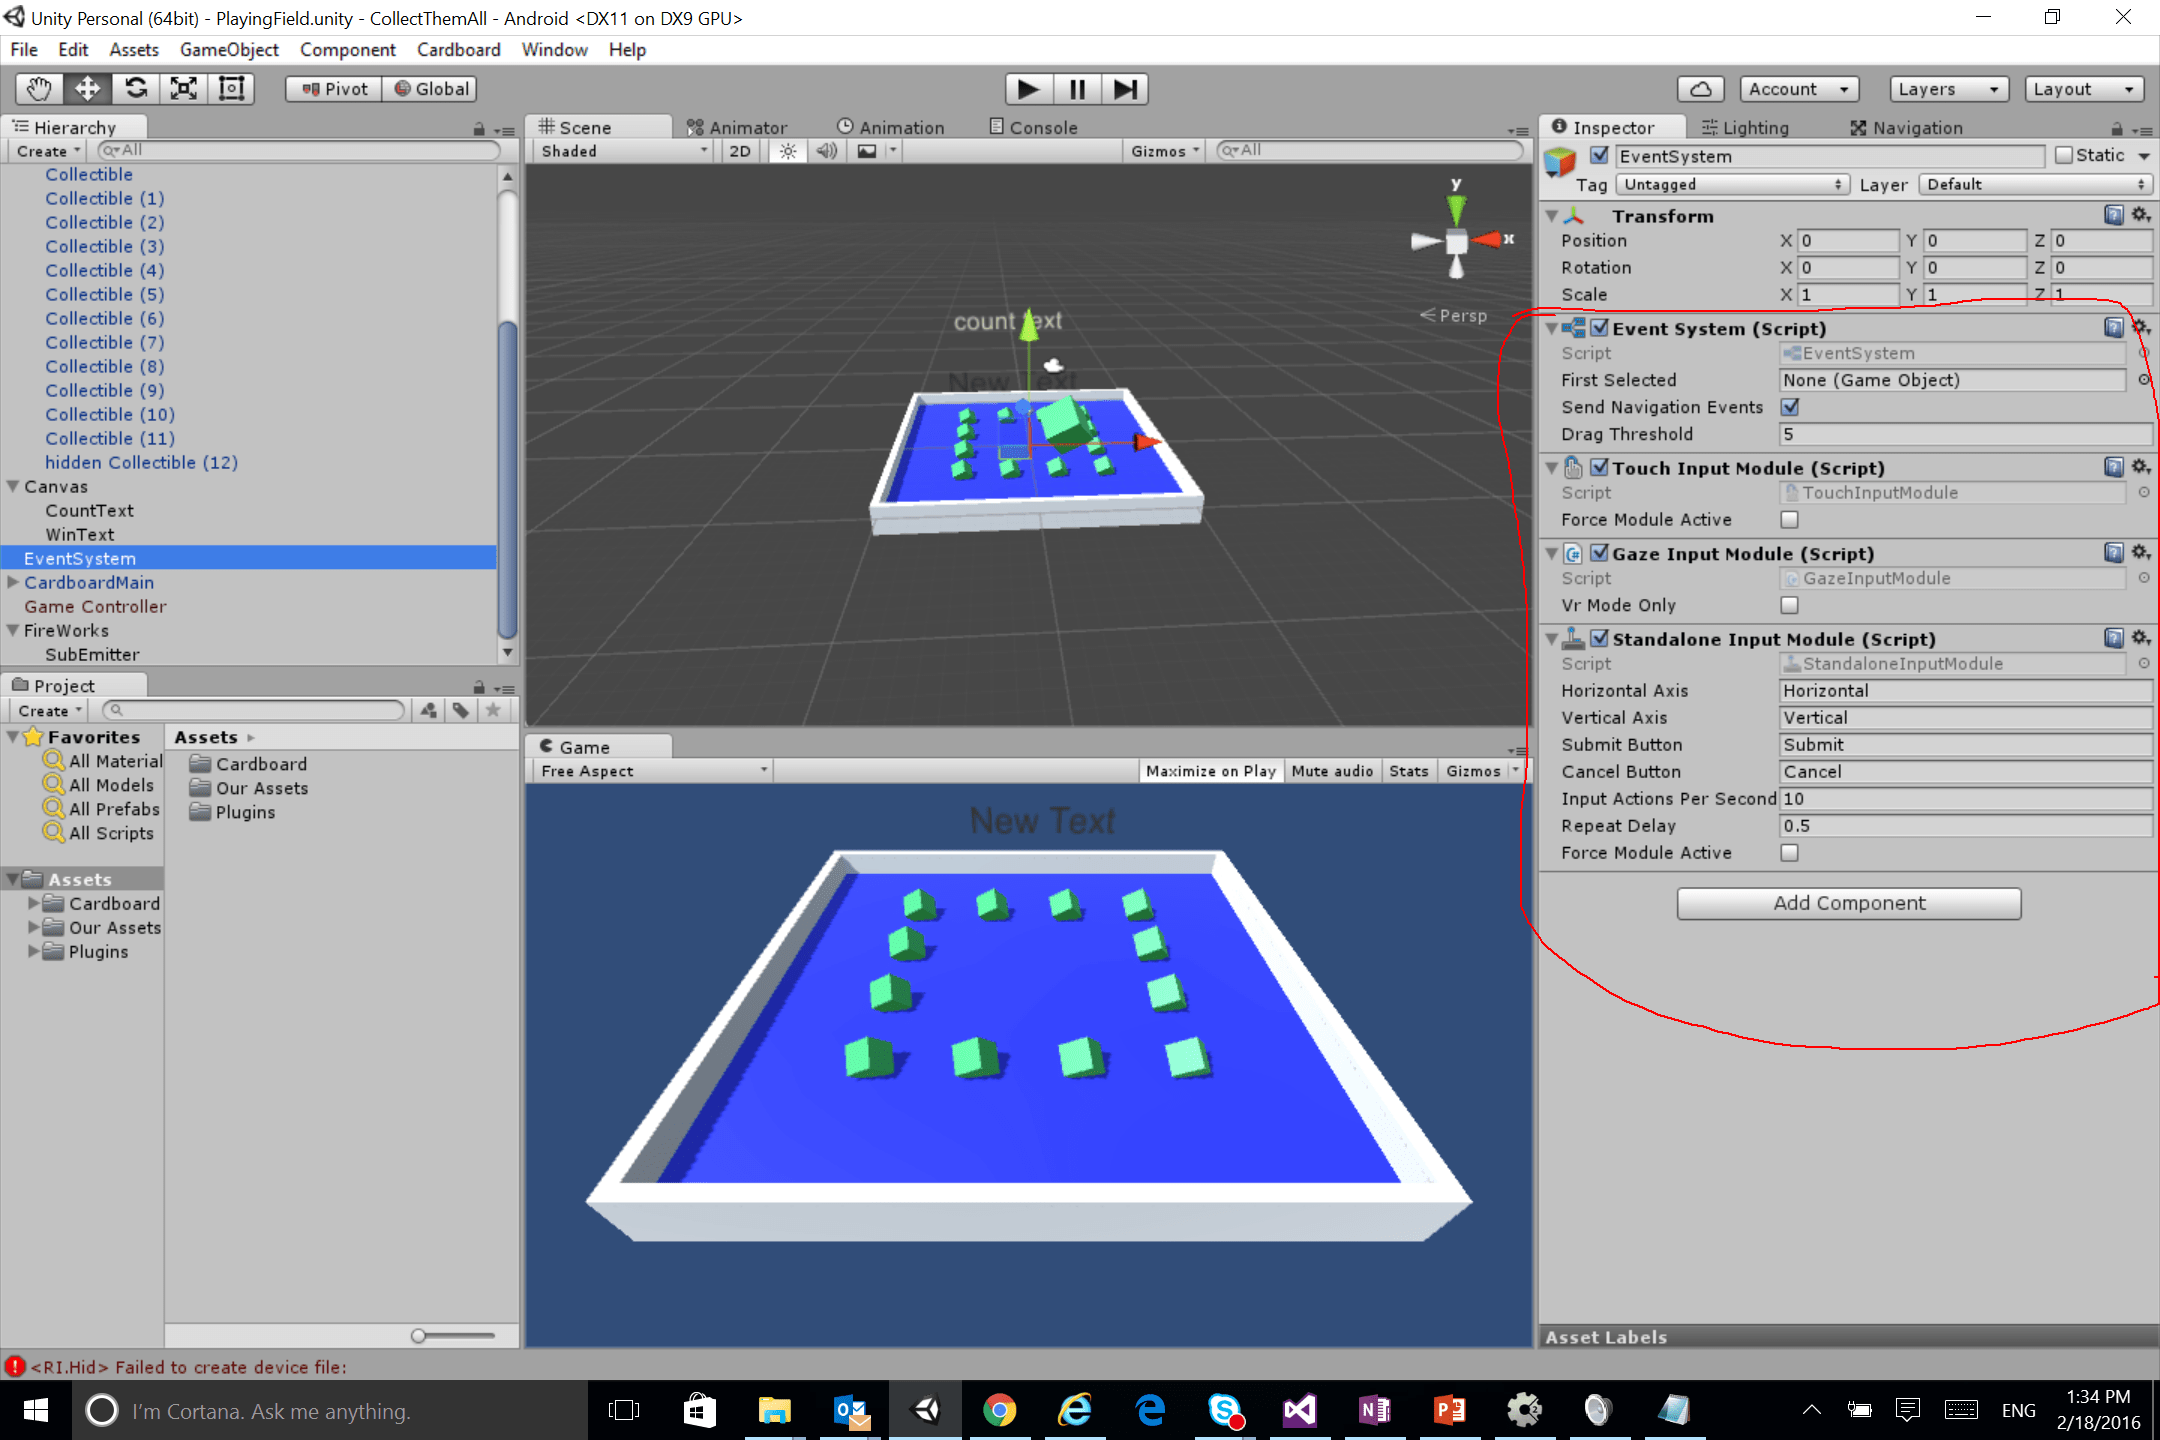 Components on EventSystem
7. Double click on the Collect script to edit it.
- We will now add some code to it to interface with the Game Controller.
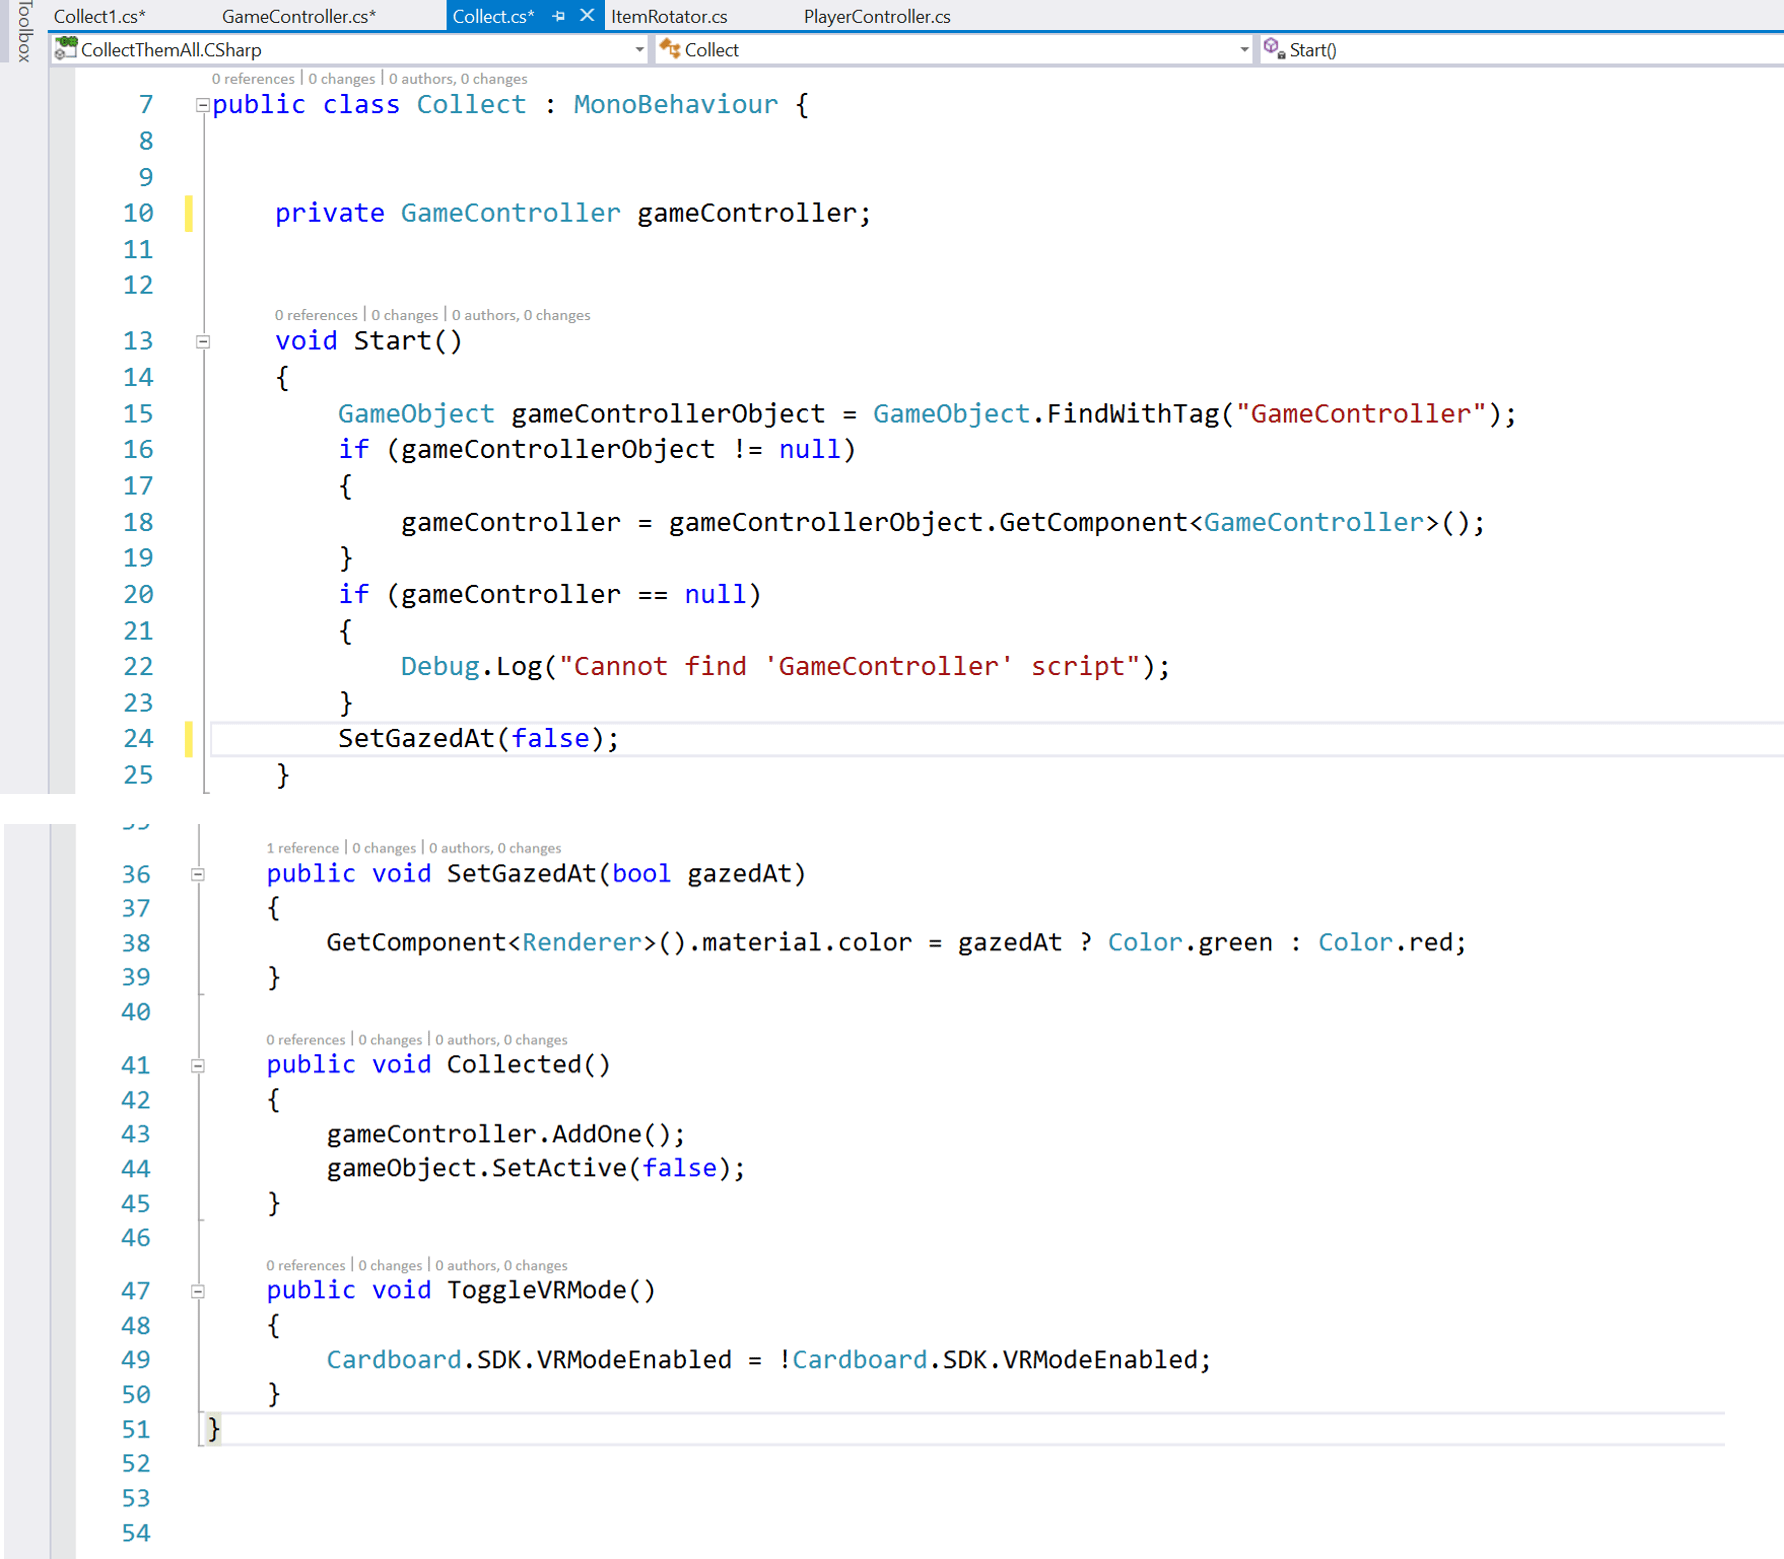 Updated Collect script. Note the updates to the different functions.
8. Drag CountText and WinText in the Scene view until you can see it in the Game view.
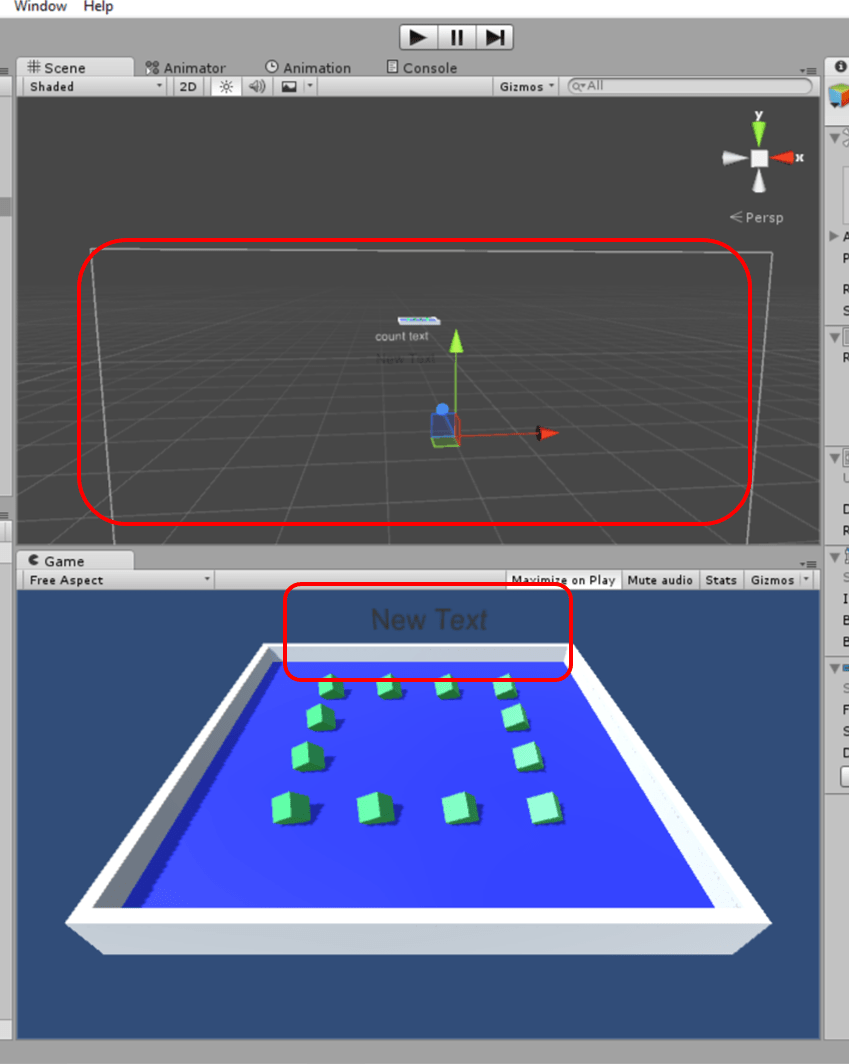 Positioning text in the world
Finishing Up
1. Press the play button to test the game!
- Hold the alt key to simulate moving your head and click the mouse to simulate pulling the trigger.
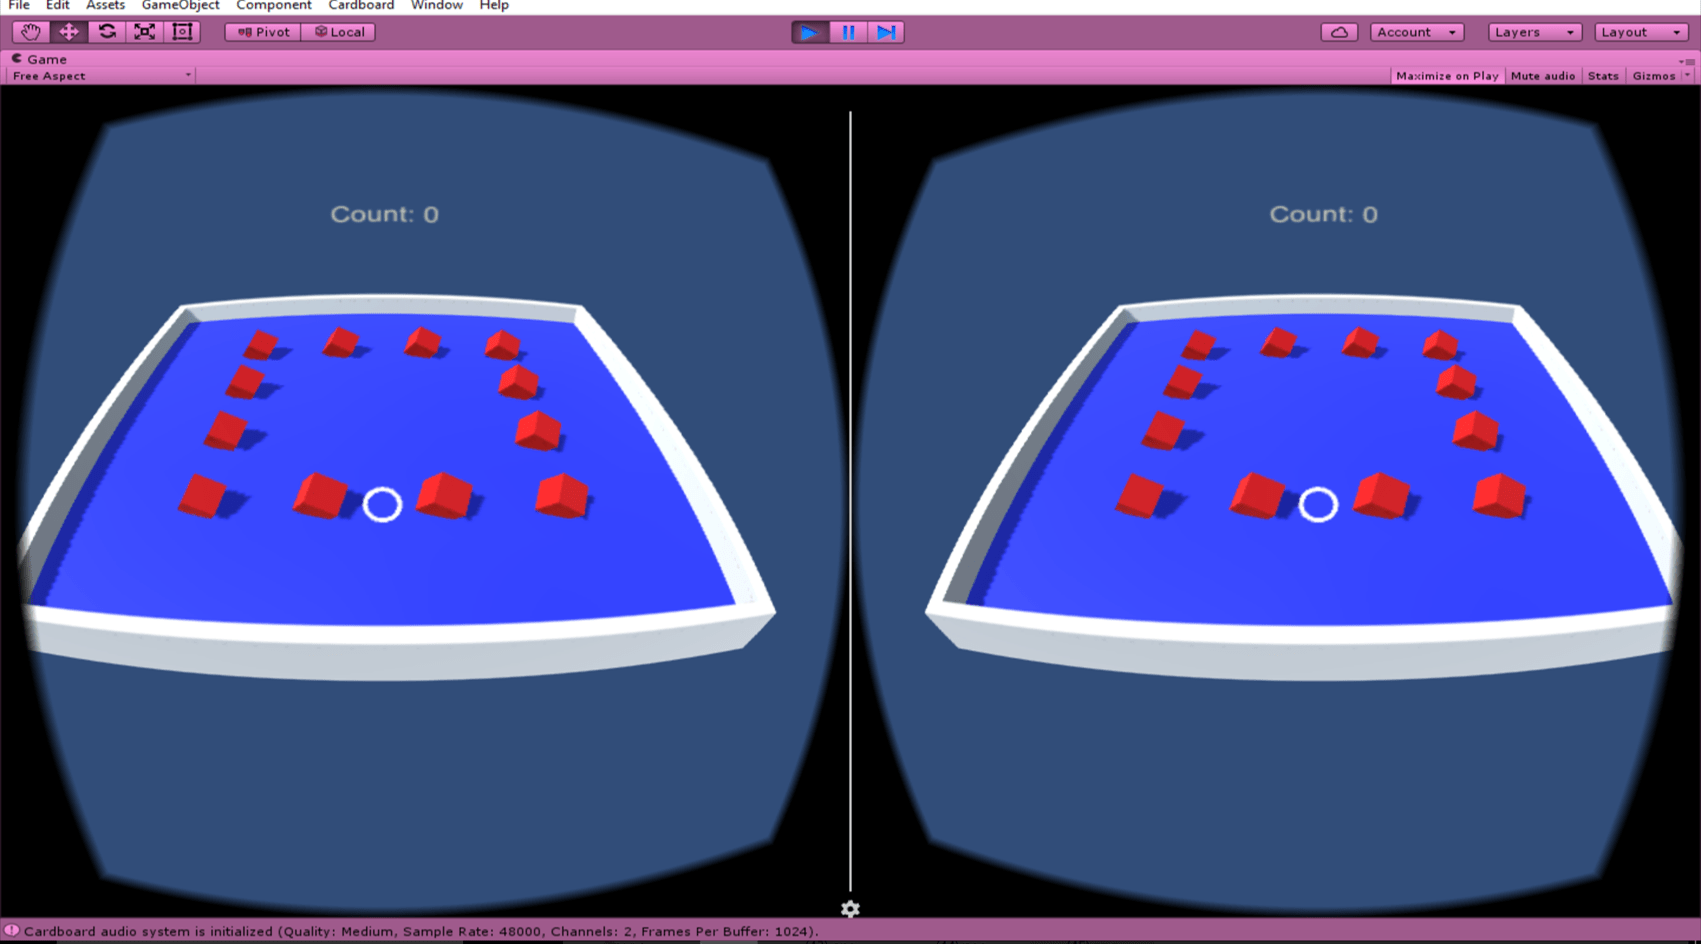 Testing our game
2. Build Settings
- Go to File > Build Settings. Click “add open scenes” to add our playing field scene to the build.
- Under “Platform” select Android. Click “Player Settings”. In the Inspector, under “Resolution and Presentation”, make sure Default Orientation is set to Landscape Left.
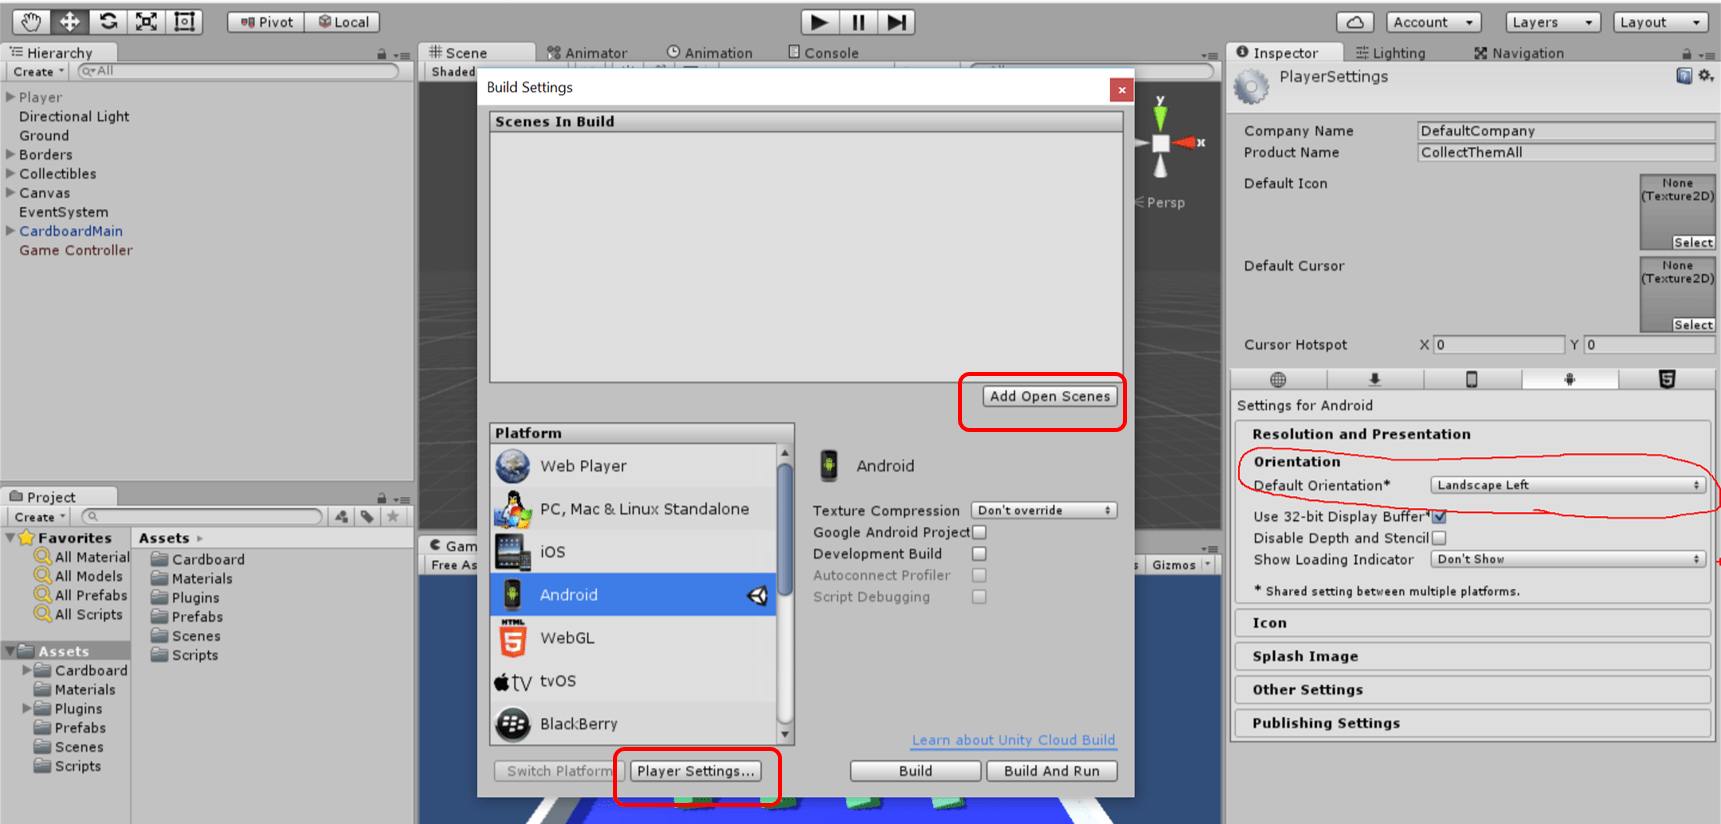 Adding open scenes and player settings
- Under “Other Settings”, make sure to rename Bundle Identifier to something along the lines of com.name.project.
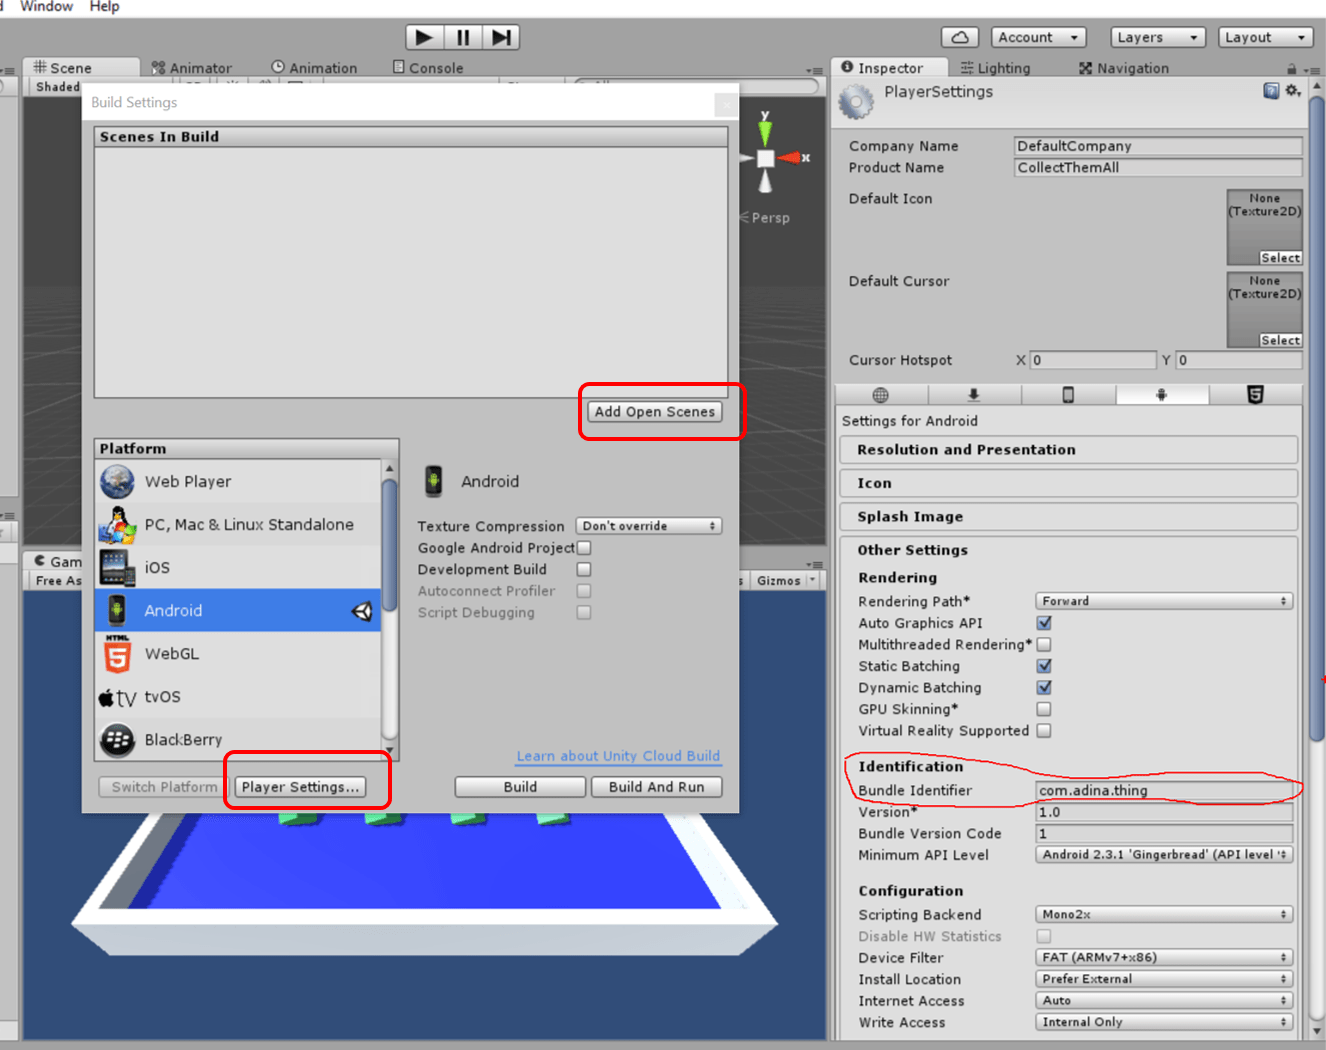 I eventually ended up naming mine com.feytechnologist.cardboardcollect
3. Android
- Make sure USB Developer Mode is enabled on your Android phone. See here if you have any errors.
- Click Build And Run. Turn on phone, you should see the Unity splash screen. Unplug after scene loads and put into your Google Cardboard.
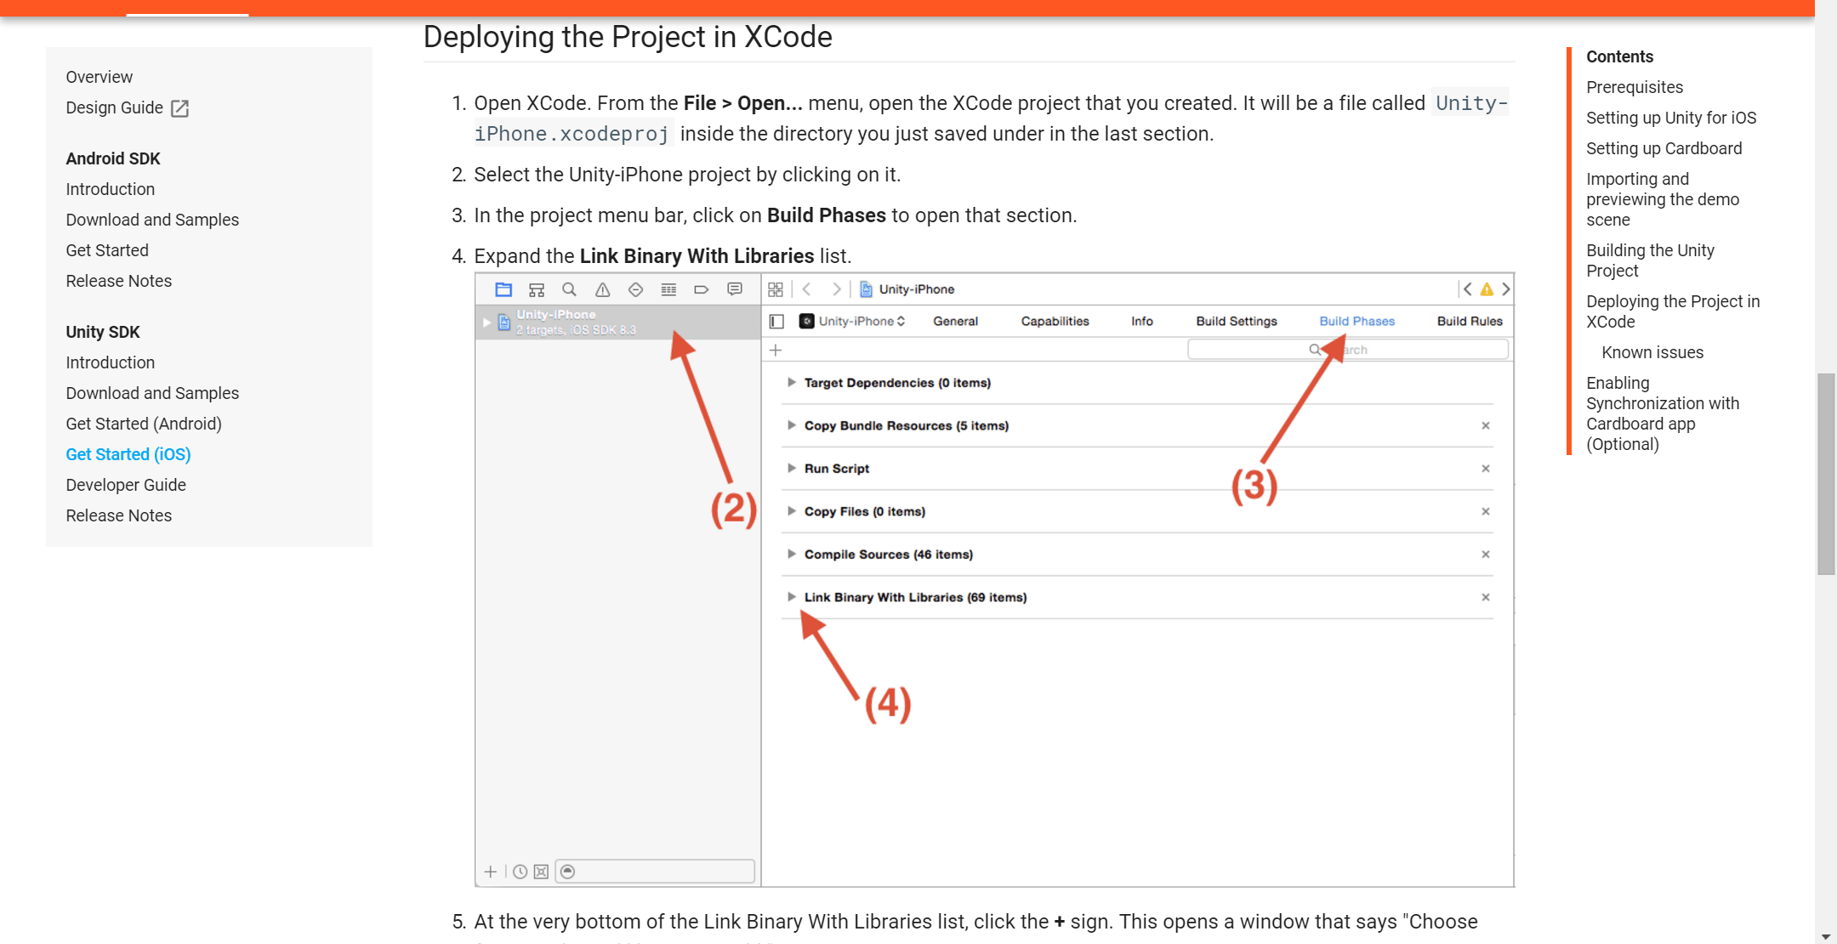
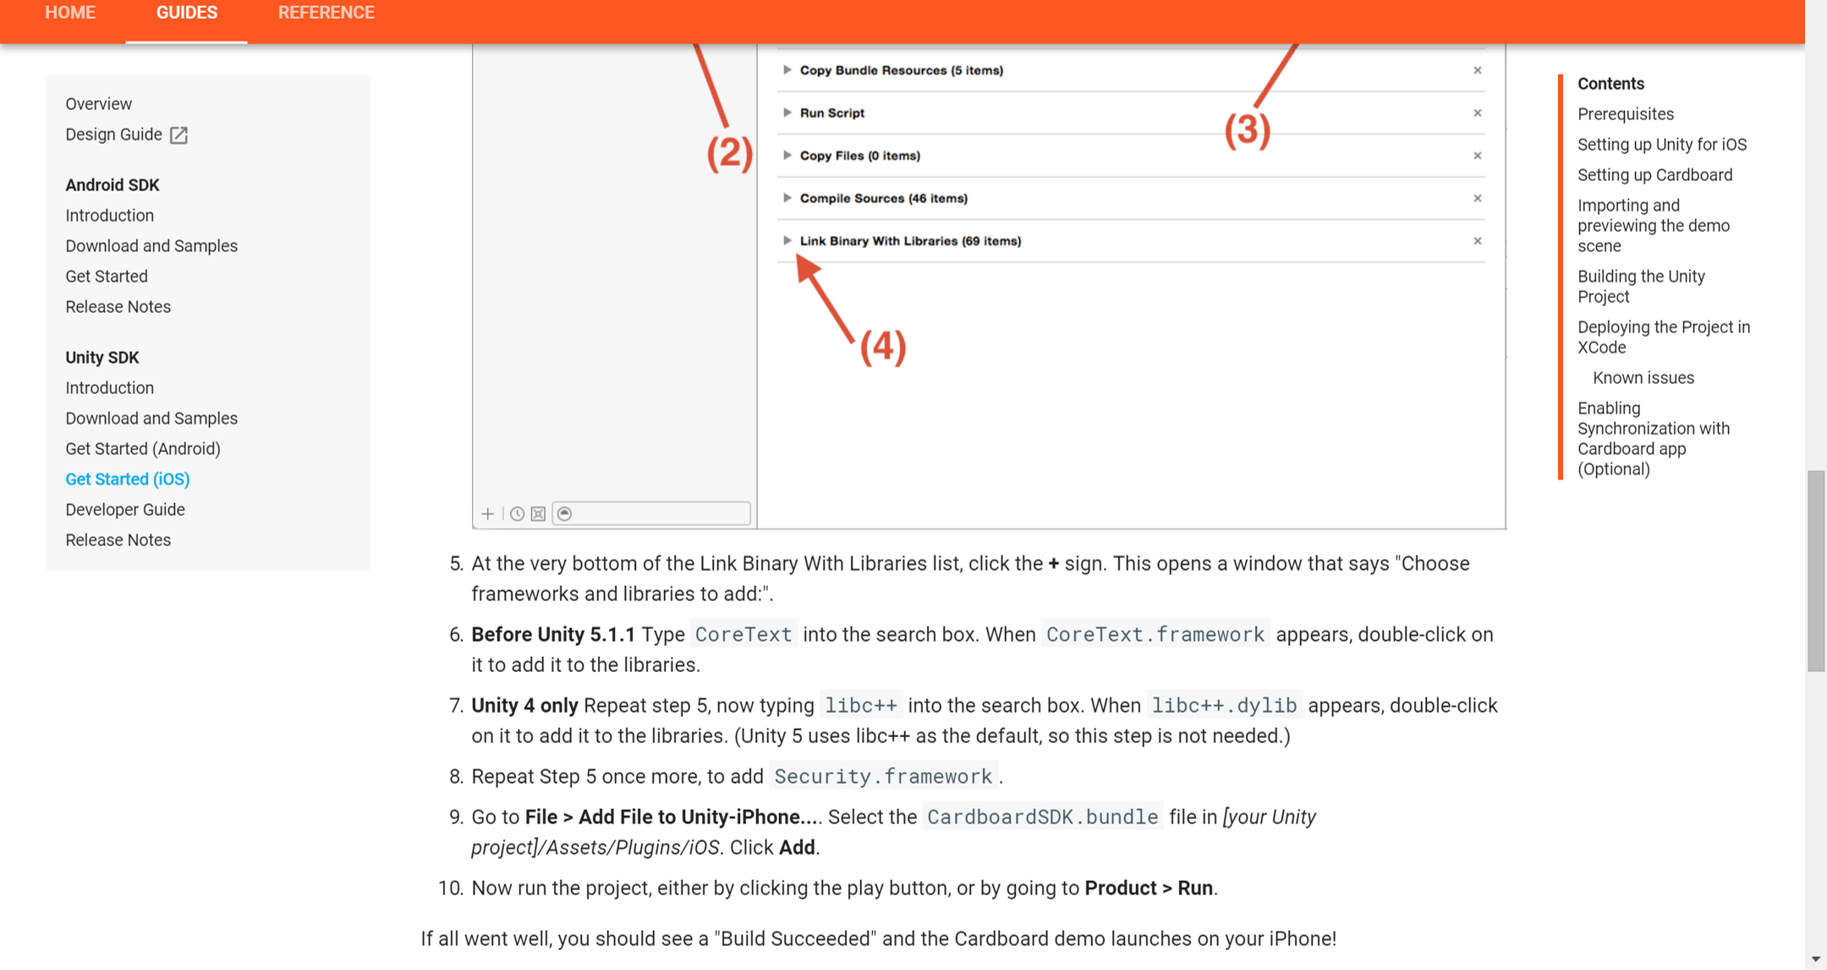
4. iOS
- The following is taken from the Google dev website. The link to the iOS deployment instructions is at the top under “getting started”.
5. Play Game!
 A Cardboard VR game of your own!